
Migrate from Medium to Hugo
The painful but worthwhile journey from constrained to unbounded.
Part of the series: From Medium to Hugo
In 2017 I set out to migrate my blog from the aged Blogger platform to something more modern. After a bit of investigation, I decided to go with Medium. I wrote a blog post outlining the reasons:
Jeremy Likness reflects on his personal history of blogging for over 15 years, shares why he moved to medium, and stats from over 8 years of his old blog.
Fast forward a few years, and although all the reasons for migrating still hold true, there are new developments that made me rethink my strategy. Like most companies, Medium has figured out they need to profit. On the surface, they really want me to make money.

Of course, Medium gets to take a cut of profits so they are very motivated to generate income from my writing. In fact, they remind me every time I open one of my stories:

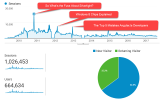
I have nothing against a company earning a profit. I do, however, prefer that my articles remain free and in the open. Would I like to make some pocket change and become a hundredaire for my efforts? Who wouldn’t! But I prefer less invasive ways, such as advertisements that you can easily block or opt-out of. I am also concerned that if Medium doesn’t start turning profits, they could likely become more aggressive or even out of business. Just recently, I was reading an article and was presented with this:

This is not what I want my readers to see! So, I set out once again to move. This time, I chose to take control of my own fate and not use a service but build, generate, and host everything on my own.
Medium allows authors to retain the full rights to their publications and has an export option to download stories I’ve written. Unfortunately, the export provides an ill-formatted dump of HTML that isn’t directly migratable to most other platforms. After extensive research, I decided that I would go with Hugo as my platform. There are several reasons I chose Hugo over the other options I explored:
- Hugo generates static content, period. I don’t have to layer something on top like the React library as is the case with Gatsby.
- Hugo is extremely fast.
- Hugo provides a local live-reload server so I can see exactly what I’m editing.
- Hugo has a huge ecosystem of themes that made it easier to style my ported articles.
- Hugo is very customizable.
- It’s based on Go and Go is just fun.
This doesn’t mean the same reasons apply to you, so I encourage you to do your own research and download various tools to take them for a spin. I felt I was able to figure out Hugo and get to a basic site faster than other tools. The only caveat is that you must learn Hugo’s syntax for generating templates, but that felt easy to me.
The decision was made, next I had to figure out the migration.
First Pass
After researching my options, I decided to start with a tool for migrating Medium to Hugo:
This tool takes the Medium export (there are instructions on the site on how to obtain this) and parses it into markdown. Although Medium treats comments like stories of their own, this tool is smart enough to skip comments and just bring over posts. I also really liked the format it used, creating separate folders for each article to provide friendly URLs and organize related images together. Instead of referencing images on Medium’s network, it downloads them and stores them locally so there are absolutely no dependencies on Medium when it’s done.
Hugo works with templates, and after a short search I found the mediumish theme that provides a look-and-feel very similar to Medium. I like the clean style and design, so I pulled that in. I love Hugo’s approach to customizations: I can import the theme “as is” then override templates by copying them into a local project folder for the changes. This way the original theme stays intact, and my custom changes can iterate independently.
After running the import tool, I eagerly spun up the website and was very happy with the results … until I started spot-checking posts. It turns out there is a lot of content the tool doesn’t bring over. I embed a lot of video, used Gist for code highlighting, and had some other embeds including slide decks and 360° photos.
In Medium, a YouTube video is completely embedded, and the export contains the video markup. A YouTube link looks something like this: https://youtu.be/XXX. In Hugo, the syntax to embed the video is this:
{{< youtube XXX >}}
In Medium, I used Gist to embed code. Using Hugo, you can embed code inline and highlight it as part of the generated page:
{{< highlight CSharp >}}
var x = 2;
{{< /highlight >}}
I could only handle so much manual typing and copy/paste that I decided to write a simple tool to speed things up.
A Utility to the Rescue
Regular expressions are my golden hammer for parsing content. I wrote a short C# utility to generate text I could copy and paste to speed up the conversion. The migration tool generates an alias to preserve the original Medium link. My C# tool was able to parse the migrated markdown files, extract the alias, then pull the original page from Medium. From there, it parsed figure captions, YouTube links, and code.
Parsing YouTube is simple enough. This regular expression finds the embeds:
private static readonly Regex youtube =
    new Regex(@"\<figure.*\>\<iframe\s*src=""https:\/\/www.youtube.com\/embed\/(\w*)\??[^\""]*\""");
A parser then extracts the matches and converts them to Hugo-style code:
Parse("YouTube", youtube, input, sb, match => $"{{{{< youtube {match.Groups[1]} >}}}}");The “gist” extraction was a little more involved. The pseudo-code:
- Finds the gist embeds in the page
- For each embed, downloads the actual gist
- Uses the extension on the filename of the gist to map a code type (i.e.
.js->JavaScript) - Parses the link for raw code from the downloaded gist
- Fetches the raw code
- Writes it out inside a set of
highlighttags
Here’s the code for those interested (yeah, I used synchronous code, don’t @ me!):
private string ParseGist(Match match)
{
    var user = match.Groups[1].Value;
    var gist = match.Groups[2].Value;

    var target = client.GetStringAsync($"https://gist.github.com/{user}/{gist}").Result;

    var extension = gist_ex.Match(target).Groups[1].ToString();
    var raw = gist_raw.Match(target).Groups[1].ToString();
    var code = client.GetStringAsync($"https://gist.github.com{raw}").Result;

    var highlight = "Text";

    if (gistMap.ContainsKey(extension))
    {
        highlight = gistMap[extension];
    }
    else if (!string.IsNullOrWhiteSpace(extension))
    {
        highlight = extension;
    }
    var builder = new StringBuilder($"{{{{<highlight {highlight}>}}}}");
    builder.AppendLine();
    builder.Append(code);
    builder.AppendLine();
    builder.AppendLine("{{</highlight>}}");
    return builder.ToString();
}
Pro Tip: It is possible to embed Hugo short codes in your code samples if you know how to escape them. Using
{{<highlight>}}in a code snippet for example will try to expand that code snippet as a short code. The reason it shows as text and doesn’t get evaluated is because I escaped it in the source, like this:{{</*highlight*/>}}. The asterisks instruct Hugo to pass through whatever is inside the braces without interpreting it as a short code.
The output after running the utility is a text file with the same name as the blog post, with content like this:
{{< youtube NZYSID8snjI >}}

<figcaption>Add the base ref after the closing style tag</figcaption>

{{<highlight c>}}
int px, py;
float x = 0, y = 0;
for (int i = 0; i <= 99999; i++)
{
    int j = rand() % 32678;
    int k = (j < p[0]) ? 0 : ((j < p[1]) ? 1 : ((j < p[2]) ? 2 : 3));
    float newx = (a[k] * x + b[k] * y + e[k]);
    y = (c[k] * x + d[k] * y + f[k]);
    x = newx;
    px = x * xscale + xoffset;
    py = y * yscale + yoffset;
    plot(px, py, 0x01);
}
{{</highlight>}}
Although I still had to manually copy and paste, I now had entire blocks that I could drop into place as opposed to manually extracting links and code.
The Power of Short Codes
A Hugo feature I absolutely love is the ability to generate HTML from your markdown using custom short codes. For example, many of my blog posts feature 360° photos hosted by Kuula. Hugo doesn’t have an existing way to render these. No problem! In my shortcodes folder I dropped an HTML file named kuula.html with this content:
<iframe width="100%" height="640"
    style="width: 95%; height: 640px; border: none; max-width: 100%;" frameborder="0"
    allow="vr,gyroscope,accelerometer,fullscreen" scrolling="no" allowfullscreen="true"
    src="https://kuula.co/share/{{ .Get 0 }}?fs=1&vr=0&thumbs=1&chromeless=0&logo=0"></iframe>
This is the template for a Kuula embed. The only thing missing is the unique identifier for my photo. Notice the {{.Get 0}} inside of the src attribute. This fetches the first parameter for the short code. With the short code defined, I put this in my markdown:
{{<kuula 7lpzw>}}
And the result is this:
I created short codes for embedding Google Maps, JavaScript “fiddles”, Slideshare decks, and even my own Twitter feed (haven’t used that one yet). I also created a more involved short code that allows me to interlink blog posts with an image and summary. I’ll write more about that in a separate post.
Supporting Comments
There was no easy way to migrate comments from Medium to the static website. Unfortunately, I had to go with a third-party service for this and the easiest appeared to be disqus. The template I used had Disqus built in, so I simply added my the appropriate short name to the configuration and turned it on for specific posts by adding the comments: true metadata. I don’t turn on comments for syndicated posts, only ones that were written originally on my blog. This is what comments end up looking like:
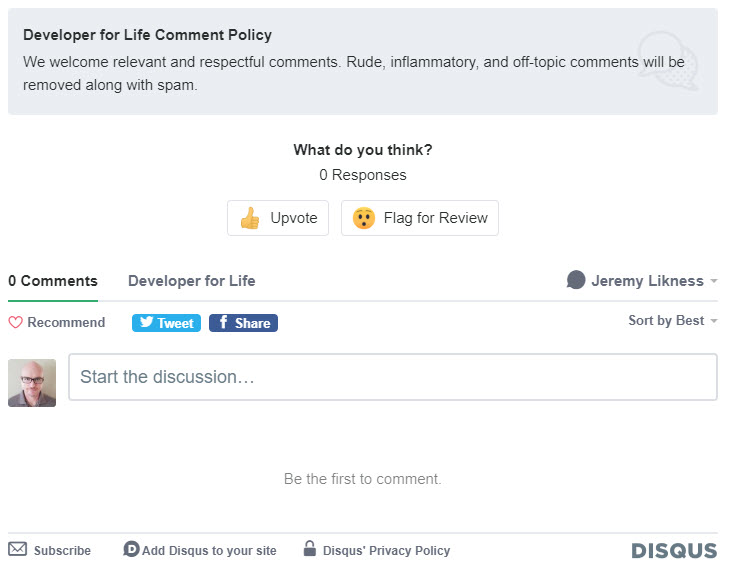
Disqus tip: By default, the free Disqus tracks information about visitors to your site that is shared with advertisers. I assume this is part of the model that supports the free version. This is “on” by default, but you can turn it off in your control panel. I turned off everything but the bare minimum needed to comment/reply.
Table of Contents
An interesting feature that is built-in to Hugo is the ability to generate a table of contents based on headings in the article. The template I used did not have this by default, so I added a simple metadata attribute called toc that I set to true when an article has enough sections to warrant a table of contents (like this one).
To render the Table of Contents, which by default is a nested unordered bulleted list, I added this to the single.html file to override the template:
{{ if (.Params.toc) }}
<aside>
    <ul>
        <li><i>In this blog post...</i></li>
    </ul>
    {{ .TableOfContents }}
</aside>
{{ end }}
The .TableOfContents function renders everything needed based on the article content.
The Archetypal Post
This is an example migrated post:
---
title: "Serverless Video: Less Servers, More Code"
author: "Jeremy Likness"
date: 2019-05-28T17:53:15.648Z
years: "2019"
lastmod: 2019-06-13T10:45:51-07:00
canonicalUrl: "https://medium.com/microsoftazure/serverless-video-less-servers-more-code-4b360a50ed7d"

description: "A video that covers the definition of serverless, describes scenarios that serverless makes sense and provides practical, working examples using Azure Functions, Logic Apps, and Event Grid."

subtitle: "Learn about the Azure serverless platform and how Azure Functions, Event Grid, and Logic Apps work together to deliver cloud native experiences."

tags:
 - Serverless
 - Azure
 - Azure Functions
 - Logic Apps
 - Cloud Native
 - Presentation

image: "/blog/2019-05-28_serverless-video-less-servers-more-code/images/1.png"
images:
 - "/blog/2019-05-28_serverless-video-less-servers-more-code/images/1.png"

aliases:
    - "/serverless-video-less-servers-more-code-4b360a50ed7d"
---
The “years” and “series” tags I created for taxonomy purposes, more on that in the next section. Date was automatically set as part of the migration. The image is the featured image. I removed the auto-display of the featured image from the post template so I can place it in a logical spot within the article. The “images” list is useful for parsing resources programmatically like I did for a few advanced customizations I’ll describe in future blog posts. Finally, the alias is automatically imported from Medium to preserve the original link. Hugo generates a permanent redirect to the new article URL.
With my default template in place, I can create an archetype to simplify creating new content:
---
title: "{{ replace .Name "-" " " | title }}"
author: "Jeremy Likness"
date: {{ .Date }}
years: "{{ now.Year }}"
lastmod: {{ .Date }}

draft: true
comments: true
toc: false

subtitle: "The very first technical presentation I gave was in the mid-nineties for a supply chain management company. Prior to that presentation my…"

description: "There will be blood."

tags:
 - Azure
 - Technology

image: "/blog/{{.Name}}/images/1.png"
images:
 - "/blog/{{.Name}}/images/1.png"
---
Now, when I want to create a new blog post with the title “This is the new thing” I simply type:
hugo new blog/this-is-the-new-thing/index.md
… and the template is generated for me to begin writing a new post.
Hugo features a live reload server, so running:
hugo server -D
And opening a browser to http://localhost:1313 allows me to preview the changes in progress.
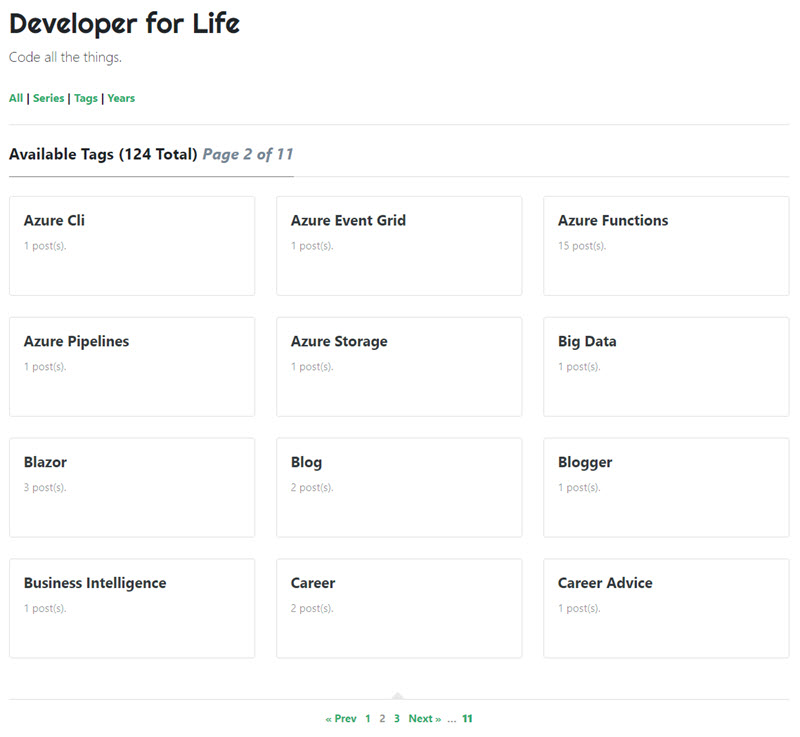
Taxonomy
Another feature I love about Hugo is the ability to group articles in custom dimensions, called “taxonomies.” By default, tags are a grouping that you can navigate to and explore articles with the same tag. My first customization was to display the tags in alphabetical order. A taxonomy is defined in config.toml:
[taxonomies]
  tag = "tags"
This will generate a list of tags at the /tags path, and a list of articles that belong to a tag at /tags/tag. For example, this article sets the tags like this:
tags:
 - Azure
 - Blog
 - Medium
 - Hugo
 - Static website
Therefore, you should be able to find it on the page /tags/Hugo. This is handled automatically.
The default template uses a special control to create pages so the user can page through long lists of content. Instead of working directly on the .Pages function, I moved it to a variable and select the sort like this:
{{ $pages := .Pages }}
{{ $pageSize := 6 }}
{{ if (eq .Page.Type "tags") }}
{{ $pages = .Pages.ByTitle }}
{{ end }}
{{ $post_paginator := .Paginate ($pages) $pageSize }}
When the page type is taxonomy it is rendering an actual dimension, so it will show article previews and is set to six articles per page. If the page type is taxonomyTerm it is showing possible dimensions to select. These take up less space and therefore I configure the template to show 12 per page:
{{ if eq .Page.Kind "taxonomyTerm" }}
{{ $pageSize = 12 }}
{{ end }}
To make it easier to scroll through archives, I also wanted a taxonomy by year. I defined this in the config.toml with year = "years" and for any article I want to appear in the archive listing, I add year = "2019" in the front matter. This will ensure it appears in /years/2019. (Yes, it’s really as simple as that.)
I also decided that because certain articles can be grouped together logically as a “series” I should create a series taxonomy: series = "series" and set the series title in the front matter: series = "From Medium to Hugo" and that creates a page at /series/from-medium-to-hugo/. The default sort for pages is most recent first. In the view by year and the view for a series, I want the articles sorted ascending order by date so that “2013” comes before “2014” and the first article in the series comes before the second article in the series.
{{ if and (eq .Page.Kind "taxonomy") (eq .Page.Type "series")}}
{{ $pages = .Pages.ByDate }}
{{ end }}
To improve navigation, I modified the list.html template to provide links for the various taxonomies and to summarize the current page number and total items.
This is the logic. I don’t mind the nested if/then statements and convoluted code because it’s just used for generation of the end website and my main goal is the right static content on the other side.
<div class="section-title">
<strong><a href="/blog">All</a> | <a href="/series">Series</a> | <a href="/tags">Tags</a>
| <a href="/years">Years</a></strong>
<h2> </h2>
{{if eq .Page.Kind "taxonomyTerm"}}
<h2><span>Available {{ .Page.Title }} ({{ len .Data.Pages }} Total)
{{ else }}
{{ if eq .Page.Type "tags" }}
<h2><span>All Posts Tagged "{{ .Page.Title }}" ({{ len .Data.Pages }} Total)
{{ else }}
{{ if eq .Page.Type "years" }}
<h2><span>All Posts From {{ .Page.Title }} ({{ len .Data.Pages }} Total)
{{ else }}
<h2><span>All Posts ({{ len .Pages}} Total){{ end }}
{{ end }}{{ end }}
{{ if gt $post_paginator.TotalPages 1 }}
<em style="color: lightslategray">Page {{ $post_paginator.PageNumber }} of {{ $post_paginator.TotalPages }}</em>
{{ end }}
</span></h2>
</div>The default paginator just had a previous and next navigation option. To help jump around to either end of the list, I extended list-partials/pagination.html like this:
<span class="navigation" role="navigation">
{{ if gt .TotalPages 1 }}
<div class="pagination">
{{ if .HasPrev }}
{{ if gt .Prev.PageNumber 1 }}
<a class="ml-1 mr-1" href="{{.First.URL}}"><strong>1</strong></a>…
{{ end }}
<a class="ml-1 mr-1" href="{{.Prev.URL}}">« Prev</a>
<a class="ml-1 mr-1" href="{{.Prev.URL}}">{{ .Prev.PageNumber }}</a>
{{ else }}
<span>« Prev</span>
{{ end }}
<span class="ml-1 mr-1">{{ .PageNumber }}</span>
{{ if .HasNext }}
<a class="ml-1 mr-1" href="{{.Next.URL}}">{{ .Next.PageNumber }}</a>
<a class="ml-1 mr-1" href="{{.Next.URL}}">Next »</a>
{{ if lt .Next.PageNumber .TotalPages }}
… <a class="ml-1 mr-1" href="{{.Last.URL}}"><strong>{{ .TotalPages }}</strong></a>
{{ end }}
{{ else }}
<span>Next »</span>
{{ end }}
</div>
{{ end }}
</span>The only issue I ran into with taxonomies is an inability to create aliases. I would love to forward Medium’s /tagged/item to Hugo’s /tags/item but it’s not possible in a straightforward way (you could just change the configuration to tags = "tagged" but I prefer the tags path). I decided to take the hit and let the search engines re-index the taxonomies.
Summary
This story is not done yet. In future articles, I’ll explore how I integrated advertisements, addressed static files including privacy pages and ads.txt, generated a Content Security Policy (CSP), built an article preview short code, and how I host and continuously deploy the blog.
In the meantime, I hope you enjoy the new site!
Regards,

Part of the series: From Medium to Hugo