
EF Core and Cosmos DB with Blazor WebAssembly
In the browser, for the browser, by the browser.
Part of the series: Blazor and EF Core
It all began as a simple idea. I’ve been speaking with customers about Entity Framework Core (EF Core) and was intrigued by the popularity of using EF Core to access Cosmos DB. I’m a huge fan of Cosmos DB and have worked with it since it evolved from Azure DocumentDB. It wasn’t clear to me why anyone would want to use EF Core when Cosmos DB has its own SDK. I started asking questions and Julie Lerman answered with this tweet for context:
Hey @markjbrown & @jeremylikness! 😁Check out this 5 year old conversation between me & @FransBouma for context on where Cosmos DB provider can add value for devs who are already EF users and aiming for Cosmos DB. How about guidance around hybrid use, ala EF & Dapper :) https://t.co/MGd9NCEjG8
— Julie Lerman (@julielerman) April 2, 2020
Many customers shared the same feedback:
- EF Core presents a common interface and set of APIs for data access
- Developers fluent in that API prefer to use it over other approaches
- EF Core hides many of the nuances of setting up the Cosmos DB client to access documents
- EF Core by convention creates a container named after the context and then stores all entity types in that table with a special type discriminator. This means less work for the developer
- In some scenarios it is possible to reuse code across providers
The last point was interesting because I spoke to an internal team working on a process that distributes data to Azure SQL and Cosmos DB. They are using Azure Functions and chose EF Core so that most of the code remains the same between connectors. For the most part, they just plug in the appropriate provider to make it work.
Speaking with these teams sold me on the idea of using EF Core for Cosmos DB. What happened next was unexpected.
The Idea
Blazor WebAssembly is one of the most amazing new technologies I’ve worked with in my career. I know that’s a bold statement, but it’s not just based on personal experience. Enabling .NET apps to run in the browser efficiently and without plug-ins is revolutionary. Customers are migrating desktop and legacy web apps to the new platform. C# developers are rejoicing that they can build responsive Single Page Apps without getting sucked into choosing a JavaScript framework and learning an entirely new language and platform.
As powerful as the technology is, it is constrained by the fact it runs as a client in the browser. This means it can’t make direct TCP connections, for example, which limits the databases it can connect to directly. All the code runs in the browser, so credentials can’t be secured the same way they are on the webserver. Therefore most access is done over HTTP APIs and creates the challenge of deciding how to serialize complex queries over the wire.
Although there are new solutions like OData and GraphQL, I wondered if they are always necessary. Firebase is a popular solution and, from what I understand, developers can easily (but securely) connect directly from the browser. Would a similar experience be possible with Blazor?
A final push for the idea came from friend and coworker Brady Gaster. He was working on a special demo and shared how much he enjoyed using EF Core for Cosmos DB. We chatted about the potential to use it in Blazor apps and considered the implications of Blazor Server vs. Blazor WebAssembly. That’s when I had my “Ah-hah!" moment (thanks, Brady!).
Why Cosmos DB
The Cosmos DB client allows two connection modes: direct (TCP) and gateway (HTTPS). Gateway mode should be usable from the browser. The challenge is how to secure credentials. There is no safe way to ship them in the browser and if anyone were to intercept them, your entire database will be compromised. I decided to first tackle if it could work, then tackle whether it should be done based on security concerns. But why even consider Cosmos DB in the browser? There are a few reasons:
- Cosmos DB can be configured with multiple regions and will automatically route to the closest (and fastest) node
- Building it into the client app removes the need to build an additional API tier (with exceptions, more on that later)
- Enterprise apps often have complex grids and search mechanisms. A client solution allows applying those queries directly to the database instead of figuring out some way to serialize them and re-materialize over the wire
- The most popular web frameworks tend to be easy to use with minimal moving parts, and I’d love to see us offer something similar
Things began to click into place. I decided I had what I need to build a quick experiment. I immediately set to work, and just as fast, hit my first roadblock. More on that in a minute.
Why Entity Framework Core
My decision to use Entity Framework Core goes beyond the fact that I work closely with the team. I’ve learned in my conversations with developers that they love using EF Core as a data access API. It also simplifies the strategy of how to store documents and discriminate between varying types - this is all done automatically. I was confident that EF Core could run in Blazor because it targets .NET Standard 2.1. The question was only whether the provider would work. I had also just demoed some new EF Core features in the ASP.NET Community Standup.
I used Cosmos DB and built an example app that handles blogs and blog posts. To keep my experiment fast and easy, I simply copied the setup from that app into my Blazor WebAssembly project. I was up and running in just a few minutes. The moment of truth had arrived. For now, I brazenly embedded my secrets as hard-coded string literals that I used to configure the database context. I hit CTRL+F5 to “Start without Debugging” and eagerly waited for the blog posts to render.
Instead, what I got was an exception.
Mono Blocker
To reproduce the error and eliminate EF Core as the culprit, I used this very simple statement:
var client = new CosmosClient(
   "[CosmosEndpoint]",
   "[CosmosKey]",
   new CosmosClientOptions()
   {
      ConnectionMode = ConnectionMode.Gateway,
      LimitToEndpoint = true
   });
Before even attempting to issue a request, the client was failing. The exception had a very large call stack with this at the top:
System.Threading.SynchronizationLockException: Cannot wait on monitors on this runtime.
Blazor doesn’t allow blocking code, and something was blocking. I filed GitHub Issue #1429 and set aside my hopes and dreams for a while. OK, maybe it wasn’t that dramatic. The Cosmos DB SDK team responded quickly and figured out how to detect the mono runtime to change some settings with the HTTP client. I was excited to receive this email from Matias:
Subject: RE: Cosmos client on Blazor WebAssembly

Jeremy,

The 3.9.0-preview2 Nuget package is now out,
with the changes for WebAssembly,
you can now try it yourself 😊

Matias
I pulled down the preview package, recompiled and ran it. Success! (Thanks, Matias!) But there was still one problem left to solve.
Security Concerns
Blazor WebAssembly runs entirely in the browser. This creates a major security concern. In most applications, the secrets are hidden in an API tier. That tier communicates with the database on behalf of the user. It is capable of restricting access based on their role. If the user credentials are compromised, a hacker can impersonate that user but is constrained to the subset of actions and data their role allows. This is far more containable than the case of a hacker obtaining administrative credentials. They could then read sensitive information or even destroy the entire database.
Storing the credentials is therefore a problem. Even if the credentials are encrypted, there has to be a way to decrypt them in order to use them. If your code can decrypt them, assume the user who has your code running in their browser can too. Therefore, ⛔ embedded credentials are a no-go.
What about requesting the credentials from the server? HTTPS is a secure protocol. It is why we trust web applications in the first place. When I log into my bank, I know a complicated handshake occurred to encrypt my data for that session so that would-be attackers are unable to steal data from the wire. This is all fine, but that data must be decrypted in the browser to be used. I can easily look at my own traffic to see what is being sent and received. Therefore ⛔ sending me master credentials over a secured connection is meaningless because I can view them on my end and use them to take over the database.
So how does Firebase work? Although Firebase “feels” like a serverless solution, my understanding is that the service itself hosts information about users. When a user authenticates from the browser, they are giving their credentials (username and password) and receiving a connection specifically configured for them. That connection is completely controlled through role-based access (RBAC) so the scope of what they can do is limited. The question is, can we create a similar scenario with Cosmos DB? It turns out the answer is, “Yes.”
📱 It turns out this problem has already been solved in mobile applications. Although there are secure ways to store secrets on phones, no one wants to risk shipping the master keys. So how do they do it?
The official documentation for Cosmos DB includes an article to learn how to secure access to data. In that article you can read about “resource tokens.” These are ephemeral (short-lived) keys for access that are generated specifically for a user. The keys allow very refined access permissions and even allow you to scope access to a particular partition key for multi-tenant scenarios. The maximum lifespan of a token is five hours, but you can configure it to a shorter duration. The default is just one hour.
Handing the user their own token only allows them to do what we want them to do anyway. If the token is somehow intercepted, the hacker only has the same level of access they would via a Web API scenario: they can only act based on the permissions the user has. They also have a limited timeline to do so.
I would be remiss to not include a major security notice here. I believe there are viable scenarios that make sense if you follow the principle of least privilege and issue only the most restrictive tokens possible (the least amount of access acceptable for the app).
Here’s a poorly drawn diagram of the process:
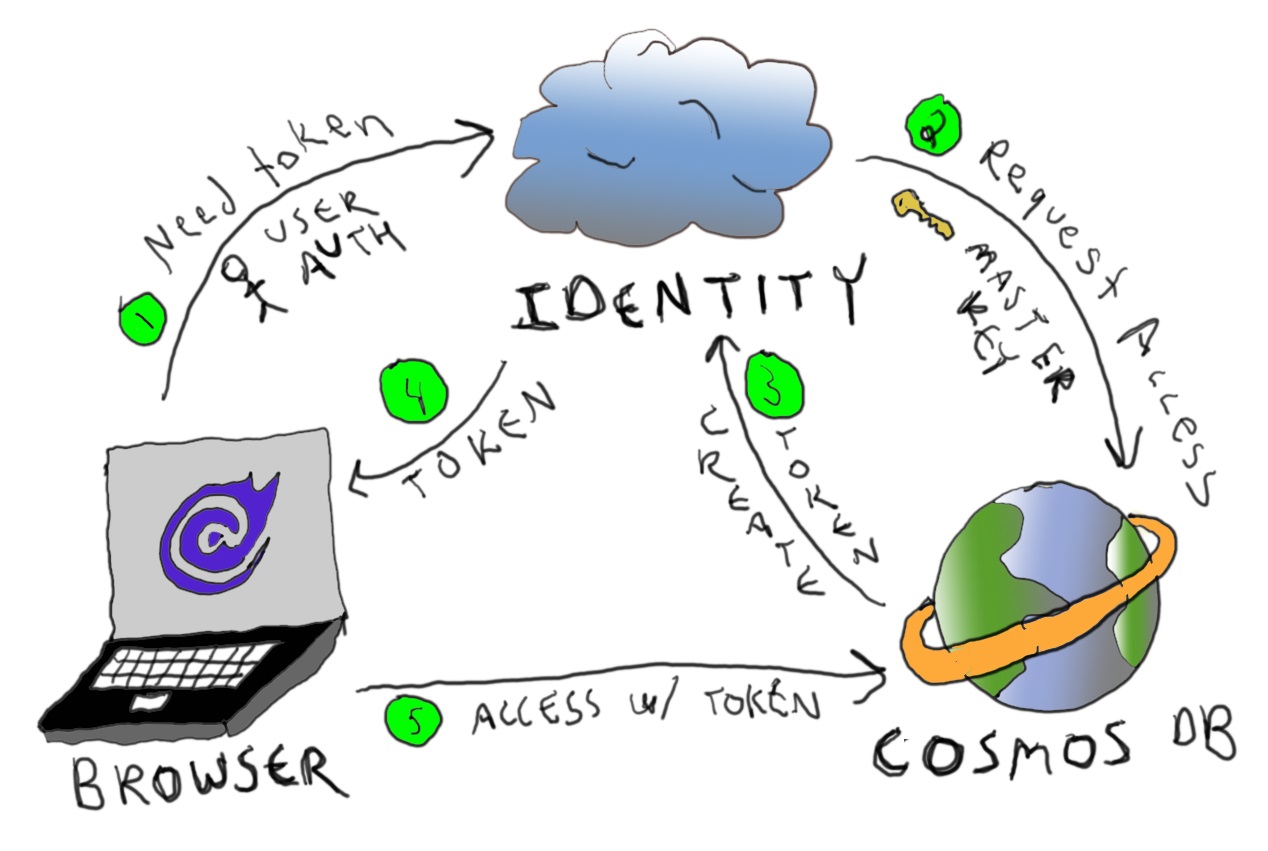
Let’s review pros and cons:
Pros:
- Simplified access from the client
- Removes an additional round-trip to an API service for subsequent calls (after the token request) resulting in lower latency
- Takes advantage of Cosmos DB global distribution to route to the nearest cluster
- Token is ephemeral and restricted
- Cross Original Resource Sharing (CORS) is configurable to constrain access (I was unable to access my endpoint until I set this up for my localhost port)
Cons:
- The token can be intercepted or stolen
- The endpoint of your Cosmos DB database is exposed, opening up a potential attack vector
- You have to either disable your IP access control policy or somehow capture all potential IP endpoints for access
⚠ The last two concerns aren’t unique to Blazor WebAssembly apps. They also exist for mobile apps that access Cosmos DB directly. I’m curious about your thoughts: do you consider the endpoint to be a “secret” and how much risk do you feel is involved when it is revealed? Would love to hear your comments below.
💡 For reference, here’s the documentation for accessing Cosmos DB from Xamarin (mobile) apps. Does anything look familiar? They had professionals draw their diagram. It turns out we’re not in completely unchartered territory here.
The Final Solution
After I was successful, I posted a teaser to Twitter. I did not anticipate the magnitude of the response I received. The biggest (well-placed) concerns are around how security is implemented.
Mission: accomplished.#Blazor 🔥 #WebAssembly 🕸 talking directly to #CosmosDB 🌍 from the browser using the #EFCore provider (yes, that is #EntityFramework Core _in_ the browser).
— Jeremy Likness ⚡️ (@jeremylikness) May 12, 2020
No credentials shipped in the client, authentication required.
Blog post will come, of course. pic.twitter.com/h7Y2aOYQ7c
I apologize to anyone looking for an out of the box solution. My project uses the latest preview bits and relies on ASP.NET Core Identity for authentication, so it has a lot of moving parts that will likely be out of date before I publish this. Instead, I’ll walk through the relevant steps and share the code I used along the way.
The first step is to create a Blazor WebAssembly project. I used the Release Candidate (3.2.0-rc1.20223.4). Choose “ASP.NET Core Hosted” so you can host authentication, then pick the option to include authentication in the app. This will set up a SQL database to store user profiles. It requires you to run an initial migration to set up the database (thanks to template magic, it will give you an option to do this directly from an error page the first time you run the app). This is just to facilitate an authentication mechanism for the example. If you have an external authentication provider, feel free to use that instead.

Your project structure will include:
BlazorApp.Client
BlazorApp.Server
BlazorApp.Shared
The preview packages target .NET 5, but the server solution defaults to ASP.NET Core 3.1. To fix that, I simply opened up the .csproj file for the server and changed the target framework to 5.0:
<PropertyGroup>
    <TargetFramework>net5.0</TargetFramework>
    <UserSecretsId>Caught you looking</UserSecretsId>
</PropertyGroup>
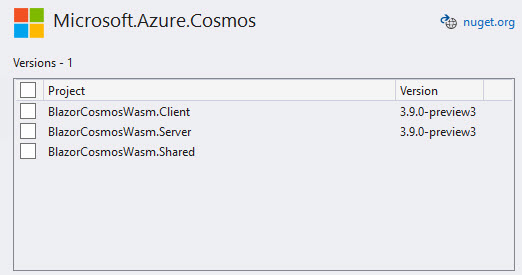
The client hosts your Blazor WebAssembly project. The server hosts authentication and any other APIs you choose to stand up. Shared is just what it implies. Now for some additions. From the NuGet package manager, install the Azure Cosmos DB SDK (Microsoft.Azure.Cosmos) version 3.9.0-preview3 or later for the server project. Install EF Core for Cosmos (Microsoft.EntityFrameworkCore.Cosmos) on the client project. I used 5.0.0-preview.3.20181.2 but anything later should work fine.
⚠ Important Step when I installed EF Core, it automatically pulled in an older version of the Azure Cosmos SDK for the client project. To fix this, I simply went into the NuGet package manager and upgraded it in the client project to the latest version.
In the server project, store your Cosmos DB connection string (this is a master key) somewhere secure. For my local test I put it in applicationSettings.Development.json under the key “CosmosConnection” (if you do this in a repo, make sure your .gitignore is setup so you don’t accidentally check it in). In production this would get put into environment variables, Azure Key Vault and/or application settings. This is the project that is not exposed to the client.
That’s the project setup, now for the custom code.
Set up the Cosmos DB User
The first step to generate a resource token is to add the user to Cosmos DB and configure permissions. You can choose how to identify your user (I will provide an example with email address, but you can use the id or name or anything else that is unique). You can also configure different sets of permissions and name them however you like. When and how you do this depends on your application design. If they should have access by default, you can add them to Cosmos DB the same time their profile is set up. Other options include the first time they try to access the resource, or as the result of some administrative action. Programmatically, the code looks like this to create the user. Because permissions are ephemeral, I’ll cover those later:
var client = new CosmosClient(CONNECTION_STRING);
var db = Client.GetDatabase("myblogs");
var cosmosUser = await db.CreateUserAsync(email);
Assuming the email [email protected] this will create a user on the myblogs database with the same name.
This step only needs to happen once. It creates the user, but it is the permissions that generate the tokens. In the Code Snippets section I share a gist that shows how to override Identity to automatically add the user to Cosmos DB.
Generate the Token
The two properties needed to connect to a Cosmos DB account are the endpoint and the key. I created a shared class to represent these properties:
public class CosmosCredentials
{
    public string EndPoint { get; set; }
    public string Key { get; set; }
}
Next, create an empty Web API controller in the server project. I named mine CosmosController.cs.
using System.Threading.Tasks;
using IConfiguration = Microsoft.Extensions.Configuration.IConfiguration;
using Microsoft.AspNetCore.Authorization;
using Microsoft.AspNetCore.Mvc;
using Microsoft.Azure.Cosmos;
using Microsoft.Extensions.Configuration;
using BlazorCosmosWasm.Shared;
using IdentityServer4.Extensions;
using System.Linq;
using Microsoft.AspNetCore.Identity;
using BlazorCosmosWasm.Server.Models;

namespace BlazorCosmosWasm.Server.Controllers
{
    [Authorize]
    [Route("api/[controller]")]
    [ApiController]
    public class CosmosController : ControllerBase
    {
        private readonly UserManager<ApplicationUser> Manager;

        public CosmosController(IConfiguration config, UserManager<ApplicationUser> manager)
        {
            Config = config;
            Manager = manager;
            Client = new CosmosClient(Config.GetValue<string>("CosmosConnection"));
       }

        private CosmosClient Client { get; }
        public IConfiguration Config { get; set; }
    }
}
Notice this expects configuration to be injected for connection strings, but also takes an instance of the user manager. This is important for us to find the email of the logged in user. The [Authorize] attribute requires the user to be logged in to access any controller methods. When the authenticated user requests the controller endpoint, their security identity includes a set of claims. The username, email, and other information don’t exist. One of the claims contains a unique identifier for the user, which can be used to obtain the remaining information. Here’s a helper method to get the email address of the logged in user:
private async Task<string> GetEmailAsync()
{
    if (User.IsAuthenticated())
    {
        var id = User.Claims.SingleOrDefault(
            key => key.Type == System.Security.Claims.ClaimTypes.NameIdentifier)?.Value;
        var user = await Manager.FindByIdAsync(id);
        return user?.Email;
    }
    return null;
}
Now that we have the email, we can request and return the token. There are three basic steps:
- Retrieve the user
- Grant the user permissions
- Retrieve the token
This example will grant the [email protected] user access to only the BlogContext container. The permission is named [email protected] and only grants “read” access. As mentioned earlier, you can further restrict access to a specific partition key. If you want to override the token expiration, pass the desired timeout in seconds after the PermissionProperties parameter.
[HttpGet]
public async Task<IActionResult> Get()
{
    var user = await GetEmailAsync();
    if (user == null)
    {
        return NotFound();
    }
    var db = Client.GetDatabase("myblogs");
    var container = db.GetContainer(nameof(BlogContext));
    var cosmosUser = db.GetUser(user);
    var permissionId = $"Permission-{user}-blogs";
    await cosmosUser.UpsertPermissionAsync(new PermissionProperties(
                id: permissionId,
                permissionMode: PermissionMode.Read,
                container: container));
    var token = await cosmosUser.GetPermission(permissionId).ReadAsync();
    return Ok(
        new CosmosCredentials
        {
            EndPoint = Client.Endpoint.ToString(),
            Key = token.Resource.Token
        });
}
The code proactively creates or updates the permissions, then grabs the token. Each time the permissions are updated, the token expiration is updated as well. Every time the permission is read, a new token is generated. You can proactively manage tokens by tracking expiration and requesting a new one, or reactively by capturing the authorization exception when it expires and request a new one.
The Data Model
OK, we’re done with the server. Let’s work on using the token. In the shared project, add the following code to define blogs, posts, and an EF Core context. I’m keeping this example simple (read only) so you may want to write some bootstrap code to insert a few sample documents. The EF Core docs explain how to seed Cosmos DB.
public class Blog
{
    public Blog()
    {
        Id = Guid.NewGuid();
    }
    public Guid Id { get; set; }
    public string Name { get; set; }
    public string Url { get; set; }
    public List<Post> Posts { get; set; } = new List<Post>();
}

[Owned]
public class Post
{
    public string Title { get; set; }
    public bool IsActive { get; set; }
}

public class BlogContext : DbContext
{
    public DbSet<Blog> Blogs { get; set; }

    public BlogContext(): base()
    {

    }

    public BlogContext(DbContextOptions<BlogContext> options): base(options)
    {

    }

    protected override void OnModelCreating(ModelBuilder modelBuilder)
    {
        modelBuilder.Entity<Blog>().Property<string>("ETag").IsEtagConcurrency();
        base.OnModelCreating(modelBuilder);
    }
}
Using DbContextOptions allows you to defer configuration and standup the context with the provider of your choice. The model building code simply adds a shadow property to track concurrency as I showed in the standup.
Let’s move over to the client project.
The Client Service
The ordinary steps to register a data context won’t work here because the token needs to be retrieved before it is initialized. Therefore, I created a service to handle the additional steps. The interface is simple:
public interface IBlogClient
{
    Task<BlogContext> GetDbContextAsync();
}
The implementation looks like this:
public class BlogClient : IBlogClient
{
    private CosmosCredentials Credentials;
    private readonly HttpClient Http;

    public BlogClient(HttpClient client)
    {
        Http = client;
    }

    public async Task<BlogContext> GetDbContextAsync()
    {
        if (Credentials == null)
        {
            await GetCredentialsAsync();
        }

        var options = new DbContextOptionsBuilder<BlogContext>()
            .UseCosmos(Credentials.EndPoint, Credentials.Key, "myblogs",
            opt =>
                opt.ConnectionMode(Microsoft.Azure.Cosmos.ConnectionMode.Gateway));

        return new BlogContext(options.Options);
    }

    private async Task GetCredentialsAsync()
    {
        Credentials = await Http.GetFromJsonAsync<CosmosCredentials>("api/Cosmos");
    }
}
The CosmosCredentials class is from the shared project. The HttpClient is injected to use the special client properties that are configured by Blazor.
The service will cache the token. Right now, the service doesn’t deal with expiration; that would involve either setting an expiration and checking it, or capturing an authorization error and re-requesting the token. Either way, the endpoint will only return a token if the user is authenticated and already added to the Cosmos DB database. The options builder then specifies the Cosmos DB provider, passes the endpoint and token, and sets the connection mode to “gateway.” This is used to create a new context that is passed back.
⭐ Normally, creating a new context is a fast operation. The preferred pattern is to create a context per operation, and this scales well under most providers (except when you are using the change tracking features to add, update, and/or delete entities). The service here gives you the flexibility to generate and discard the context or hang onto it.
I registered it as “scoped” in the client project Program.cs:
builder.Services.AddScoped<IBlogClient, BlogClient>();
The final step is to use the service and consume some data.
The View Component
Next, create a Razor component named cosmos.razor. The heading should look like this:
@page "/cosmos"
@using Microsoft.AspNetCore.Authorization
@using Microsoft.AspNetCore.Components.WebAssembly.Authentication
@using BlazorCosmosWasm.Shared
@using BlazorCosmosWasm.Client.Data
@using Microsoft.EntityFrameworkCore
@attribute [Authorize]
@inject IBlogClient Client
A few things are going on here:
- The route is set to “cosmos” for navigation
- The
[Authorize]attribute is used to require authorization for the page - The blog service is injected
Next, the template to render the blog content:
@if (Blogs != null)
{
    <h1>Blogs</h1>
    @foreach (var blog in Blogs)
    {
        <h2><a href="@blog.Url" target="_blank">@blog.Name</a></h2>
        <ul>
            @foreach (var post in blog.Posts)
            {
                @if (post.IsActive)
                {
                    <li><strong>@post.Title</strong></li>
                }
                else
                {
                    <li>(inactive) @post.Title</li>
                }
            }

        </ul>
    }
}
I also added a “loading” prompt and an error message:
@if (Blogs == null && string.IsNullOrWhiteSpace(error))
{
    <p class="alert alert-info">Loading...</p>
}

@if (Blogs == null && !string.IsNullOrWhiteSpace(error))
{
    <p class="alert alert-danger">Bad news: @error</p>
}
The code exposes an error property and a list of blogs:
public List<Blog> Blogs = null;
public string error;
Finally, the initialization code:
protected override async Task OnInitializedAsync()
{
    BlogContext blogContext = null;
    try
    {
        blogContext = await Client.GetDbContextAsync();
    }
    catch (AccessTokenNotAvailableException exception)
    {
        exception.Redirect();
    }
    catch (Exception ex)
    {
        error = ex.Message;
    }

    if (string.IsNullOrEmpty(error))
    {
        using (blogContext)
        {
            Blogs = await blogContext.Blogs.ToListAsync();
        }
    }
}
If the user is not authorized when the token endpoint is accessed, an exception is thrown that redirects them to a page to login or register. Any other errors are simply captured and displayed. The context is used to fetch the list and then disposed immediately. I’ve been asked how fast it takes to render. This is a real-time capture of the process.
That’s a wrap!
Code Snippets
For a more complete look at the code, I created several gists:
- CosmosExtensions.cs - a few helper methods.
- CosmosController.cs - the entire code of my token controller.
- ApplicationCosmosDbContext.cs - a custom context that derives from the Identity context. It uses the context to find new users, then automatically adds them as Cosmos DB users (if you decide to use this, don’t forget to intercept the removal or deactivation of users as well). This gets registered in place of
ApplicationDbContextin the startup methods. - BlogClient.cs - a version of the client that will retry on failure in case the exception is due to an expired token.
Conclusion
I believe that this experience can be a game changer for building applications, especially if the majority of effort is based on reading and querying data. There are definite security concerns to consider for this approach, but I’m not convinced they are much different than the experience of connecting from mobile. Although Cosmos DB was my first target for using EF Core in the client, there are other possibilities as well. Other teams have successfully implemented in-browser versions of SQLite. It will be interesting to explore how to set that up with the EF Core provider and consider scenarios like offline apps and disconnected sync.
I was surprised by how much attention my original tweet generated, so I’m very interested to hear your thoughts. What are your thoughts and concerns around Cosmos DB in Blazor WebAssembly? Do you have use cases this may work well for? Is there a security risk I didn’t consider that you would like to relate? How do you feel about using EF Core as a “database dialect” in your Blazor apps, regardless of whether it is working through a direct provider or simply transports the requests to the server and materializes results over the wire?
Please comment below!
Regards,

Part of the series: Blazor and EF Core
- EF Core and Cosmos DB with Blazor WebAssembly
- Azure AD Secured Serverless Cosmos DB from Blazor WebAssembly
- Build a Blazor WebAssembly Line of Business App Part 1: Intro and Data Access
- Build a Blazor WebAssembly Line of Business App Part 2: Client and Server
- Build a Blazor WebAssembly Line of Business App Part 3: Query, Delete and Concurrency
- Build a Blazor WebAssembly LOB App Part 4: Make it Blazor-Friendly
- Build an Azure AD Secured Blazor Server Line of Business App