
Build Data-Driven Web Apps Blazing Fast with Blazor and OData
Step aside GraphQL, this is WCF RIA reborn!
Once upon a time there was a technology named WCF RIA Services. It made our lives easier by providing a magical bridge between the client and the server. Behind the scenes, it generated a set of endpoints and proxies that worked together to create a seamless experience across the stack. Using a LINQ query over a domain object in your Silverlight app generated the appropriate API calls to the server that would filter, transport, and deserialize the data.
Imagine for a second if implementing advanced filtering and sorting over a REST endpoint was as simple as writing this fluent code to run in any browser client:
return _client.For<Todo>
    .Filter(todo => !todo.Complete)
    .Orderby(todo => todo.Description);
“Give me a list of
Todoitems that are not yet marked complete and order them by the description.”
This would generate the appropriate call to the server to fetch the filtered and ordered list (as opposed to bring the entire list over the network and then filtering it.)
What if you could use the exact same Todo model in your client, with business logic and validations, to provide a form for the user to add and update the list?
Don’t fret. This is possible today. No, I’m not talking about making the effort to build a glorified GraphQL client and dropping a massive JSON payload to get what you want. I’m talking about out-of-the-box with the power of Blazor and using very stable and mature OData. It doesn’t matter if your backend is a SQL Server, a NoSQL Cosmos DB instance, or an in-memory cache.
Intrigued? Let’s explore how with a simple “todo” application.
OData: GraphQL before GraphQL
GraphQL is a popular technology today. It empowers front-end/client-side developers to query data and shape the results, such as only bringing back a subset of available properties and/or navigating complex object graphs. Despite the excitement around GraphQL as a “newer” technology, the capabilities it provides have been available to .NET developers for more than a decade. Project Astoria was announced to the public in July of 2007. I recently hosted a Channel 9 On .NET OData episode that you can watch here if you’re not familiar with OData or need a refresher.
To keep the demo self-contained, I created a server project to serve the OData endpoint. The client will just easily work with any existing OData endpoint regardless of what server or technology is used to deliver it. The server portion of the example application is a .NET Core 2.1 project that exposes an OData API for a Todo repository. You can access the source code here:
Here is the definition of a Todo item. It is defined in a .NET Standard class library that is shared by both the server and the client. Notice that I am using data annotations to require a description and provide a message to display when validation fails. I also provide some business logic by exposing the MarkComplete operation that will set Complete to true and set the MarkedComplete date.
public class Todo
{
    public Todo()
    {
        Created = DateTime.UtcNow;
    }

    public int Id { get; set; }
    public bool Complete { get; set; }
    public DateTime Created { get; set; }
    public DateTime? MarkedComplete { get; set; }

    [Required(ErrorMessage = "Description is required.")]
    public string Description { get; set; }

    public void MarkComplete()
    {
        if (!Complete)
        {
            Complete = true;
            MarkedComplete = DateTime.UtcNow;
        }
    }
}
For this example, I’m using Entity Framework Core to set up a context for the data because I can specify an in-memory database to keep the example simple. It is a simple configuration change to switch to a more permanent, production-ready database such as SQL Server or Cosmos DB.
public class TodoContext : DbContext
{
    public TodoContext(DbContextOptions options) : base(options)
    {

    }

    public DbSet<Todo> TodoList { get; set; }
}
Although OData will work with any data source and does not require Entity Framework, using Entity Framework makes it easier to scaffold the OData controller.
In the Startup.cs the OData service is added:
services.AddOData();The configuration creates an entity data model to expose operations for the Todo class.
app.UseMvc(routes =>
{
    routes.EnableDependencyInjection();
    routes.Select().OrderBy().Filter().Count();
    var builder = new ODataConventionModelBuilder();
    builder.EntitySet<Todo>("todos").EntityType.Filter().Count().Expand().OrderBy().Select();
    routes.MapODataServiceRoute("odata", "odata", builder.GetEdmModel());
    routes.MapRoute(
        name: "default",
        template: "{controller=Home}/{action=Index}/{id?}");
});
The endpoint will start with /odata instead of the traditional Web API /api prefix. The entity set allows filtering, sums, expanding related objects (not demonstrated in this sample project) and ordering.
The controller inherits from ODataController:
[EnableCors]
[ODataRoutePrefix("todos")]
public class TodosController : ODataController
{
}
I’m just enabling CORS across the board. A production application should implement it so that only the actual domains and methods used in production are allowed.
Now I want you to brace yourself. Adding an endpoint that supports features like projection, filtering, and sorting is as complicated as this:
[EnableQuery]
[ODataRoute]
public IEnumerable<Todo> GetTodoList()
{
    return _context.TodoList;
}
At this stage I can construct an OData query. Here, I’m using the cross-platform .NET Core global HTTPREPL tool to query my items. Notice in the results I get exactly (and only) what I asked for:
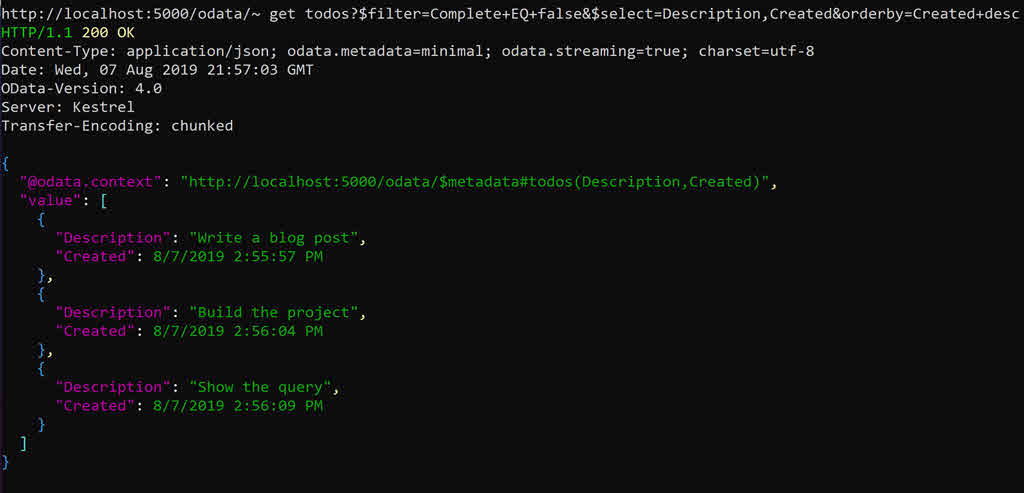
“Give me items that aren’t complete. Just bring back description and created date and order them so the most recently created item appears first.”
The data annotations are automatically parsed by the controller, so the code to insert an item with validation (to keep the server from inserting a Todo entity with no description) looks like this:
[ODataRoute]
public async Task<IActionResult> Post([FromBody] Todo todo)
{
    if (!ModelState.IsValid) // auto-magic
    {
        return BadRequest(ModelState); // with an explicit message!
    }

    _context.TodoList.Add(todo);
    await _context.SaveChangesAsync();

    return CreatedAtAction("GetTodo", new { id = todo.Id }, todo);
}
Feel free to browse the other controller actions (for example, note how the PATCH endpoint calls the MarkComplete operation when appropriate). Now that a proper OData client is complete, let’s explore what it takes to build out a web client that will run on any modern browser whether it’s on a desktop, laptop, tablet or phone.
Blazor: Plugin-Free .NET in your Browser
If you’re not already familiar with Blazor, I’ve written a few Blazor articles already. Check them out!
In this section I cover everything from building reusable view components to implementing validation with the MVVM pattern. If you just want to skip to the goods and see how to craft a query using fluent C#, feel free to jump to the Simple OData Client.
I created a Blazor client project and added a reference to the shared Todo model. Then I created three Razor view components. The first, TodoErrors, is a control to display error messages (the classes show I can interoperate easily with existing JavaScript and CSS libraries like Bootstrap):
@foreach(var error in Errors)
{
    <div class="alert alert-danger">@error</div>
}
@code {
    [Parameter]
    public List<string> Errors { get; set; }
}
This is where I point out that I am aware there are built-in Blazor controls that automatically work with validations. I purposefully “rolled my own” to show off a few Blazor features that are covered later.
Next, I tackled displaying the actual Todo. I prefer to start simple and layer services, so the view component is designed to accept actions and the entity as a parameter. I can hard-code something while I’m testing it and wire in the “real” service later.
<div>
<button @onclick="Delete">Delete</button>
@if(CurrentItem.Complete)
{
<p><strong>@CurrentItem.Description</strong></p>
<p>Completed: @CurrentItem.MarkedComplete</p>
}
else
{
<button @onclick="Markcomplete">Done</button>
<p>@CurrentItem.Description</p>
}
<p>Created: @CurrentItem.Created</p>
</div>
@code {
[Parameter]
public Todo CurrentItem { get; set; }
[Parameter]
public Action Markcomplete { get; set; }
[Parameter]
public Action Delete { get; set; }
}Finally, the main list component. Here’s some header text and options that are always available:
<h2>Todo List</h2>
<p>
    Show Completed:
    <input type="checkbox" @bind-value="ViewModel.ShowCompleted" />
</p>
<p>
    Sort By Created:
    <input type="checkbox" @bind-value="ViewModel.SortByCreated" />
</p>
Whoa, what’s that? Yes, I snuck in a view model. Right now, it exposes some flags. By default, I only show items that haven’t been completed. The default sort is by description (ascending) and you can choose to show the most recently created items first (therefore, date descending). If you choose to show everything, I conditionally provide this option:
@if (ViewModel.ShowCompleted && !ViewModel.SortByCreated)
{
<p>
Completed then Created
<input type="checkbox" @bind-value="ViewModel.SortByCompleted" />
</p>
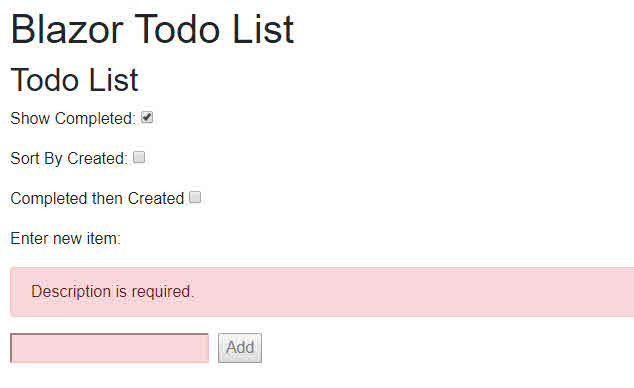
}Here’s a simple label and input box to enter a new item.
<p>Enter new item:</p>
@if (ViewModel.ValidationHasErrors)
{
<TodoErrors Errors="@ViewModel.Errors" />
}
<p>
<input name="newItem" type="text"
@ref="InputBox"
@attributes="inputattributes"
@bind-value="ViewModel.NewDescription"
@bind-value:event="oninput" />
<button @attributes="btnattributes"
@onclick="@(async () => await ViewModel.AddNewAsync())">
Add
</button>
</p>A few notes:
- The
@attributesbinding is cool. I can bind to a dictionary of key/value pairs and they will be applied as attributes. Therefore, I’m manually manipulating the validation status rather than using the built-in control, which is easier because it “just works.” - The
@bind-attributes indicate what property to use for databinding and theoninputevent ensures the binding is updated as the user types, rather than the default which is when the field loses focus. - I use the
@attributeson the button to disable it when the input is invalid, or an asynchronous operation is occurring. - I’m communicating with the server so most of my methods are asynchronous. This is no problem to implement, as you can see: I’m “promoting” the event to an asynchronous one and waiting for the method.
Here’s the template for the list of items.
@if (todos == null || ViewModel.Loading)
{
    <p><strong>Loading...</strong></p>
}
else
{
    @foreach (var todo in todos)
    {
        <TodoShow CurrentItem="@todo"
            Markcomplete="@(async () => await ViewModel.MarkdoneAsync(todo))"
            Delete="@(async () => await ViewModel.DeleteAsync(todo))" />
    }
}
The “grid” ends up looking like this:
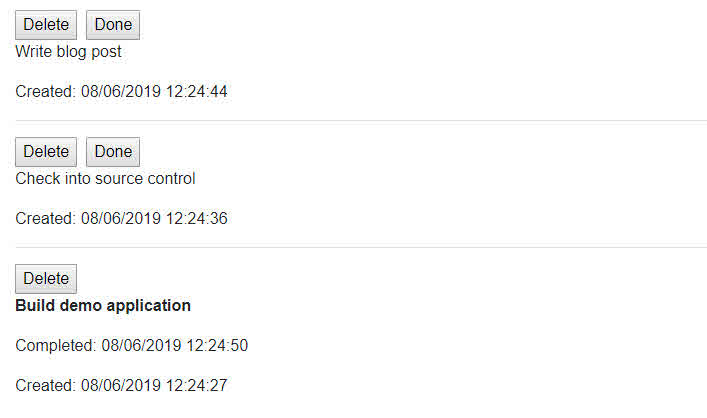
“Jim, I’m a programmer, not a designer.”
I show the loading prompt if the list is null (if there are no items it will be empty) or when a property on the viewmodel indicates an asynchronous operation is in progress. I exposed a few Action parameters on the view component for individual items, so I wire these up as asynchronous calls that pass the current item to the viewmodel.
After the component is initialized, I load the initial list and set up property changed notification to update the button status. This fires any time the user is entering text, so I only want to refresh the list when it’s needed (and not on every key press). I assume the viewmodel will raise a property changed notification for TodosAsync whenever the list needs to be refreshed. The StateHasChanged causes the template to re-render.
protected override async Task OnInitializedAsync()
{
    todos = (await ViewModel.TodosAsync()).ToList();
    ViewModel.NewDescription = string.Empty;
    ViewModel.PropertyChanged += async (o, e) =>
    {
        CheckButton();
        if (e.PropertyName.Equals(nameof(ViewModel.TodosAsync)))
        {
            todos = (await ViewModel.TodosAsync()).ToList();
        }
        StateHasChanged();
    };
    await base.OnInitializedAsync();
}
The last bit of code is to handle the input and button attributes.
private void CheckButton()
{
    btnattributes.Clear();
    inputattributes.Clear();
    if (ViewModel.Loading)
    {
        btnattributes.Add("disabled", "");
        inputattributes.Add("disabled", "");
    }
    else if (ViewModel.ValidationHasErrors)
    {
        btnattributes.Add("disabled", "");
        inputattributes.Add("class", "alert-danger");
    }
}
I assume the viewmodel indicates when validation errors exist, so I can show you how manual validation works using the data annotations defined on the Todo class.
Put a Little MVVM in your App
At this stage, the view is set, and we just need a viewmodel to wire up the data. The first thing I did was set up an interface to mock the server calls. The interface should be self-explanatory. In this example I’m restricting the filters that are available, but I could have exposed the filter as an IQueryable if I wanted more flexibility.
public interface ITodoDataAccess
{
    Task<IEnumerable<Todo>> GetAsync(bool showAll,
        bool byCreated, bool byCompleted);
    Task<Todo> GetAsync(int id);
    Task<Todo> AddAsync(Todo itemToUpdate);
    Task<Todo> UpdateAsync(Todo item);
    Task<bool> DeleteAsync(Todo item);
}
Before even worrying about calling APIs or communicating with the server, I created a MockTodoData implementation you can view here. It satisfies the interface using an in-memory list. Because Blazor has built-in dependency injection (DI), I can register the viewmodel and mock service like this in Program.cs:
builder.Services.AddSingleton<ITodoDataAccess, MockTodoData>();
builder.Services.AddSingleton<TodoViewModel>();
If I give the viewmodel a constructor that accepts ITodoDataAccess as a parameter, the Blazor DI service will pass in the right instance for me when it constructs the viewmodel.
The full implementation of the viewmodel is available here. A few highlights:
Manual validation
If I’m not using a built-in control and need to use manual validation, I can easily tap into the same validation services that are used by the controllers on the server side. This is the code for the input property. It is placed on an object and passed to validation. If errors exist, I load them to the view model and raise a property changed notification.
public string NewDescription
{
    get => _newDescription;
    set
    {
        if (value != _newDescription)
        {
            _newDescription = value;
            _newTodo.Description = value;
            var context = new ValidationContext(_newTodo);
            var results = new List<ValidationResult>();
            Errors.Clear();
            if (!Validator.TryValidateObject(_newTodo, context, results))
            {
                foreach(var item in results)
                {
                    Errors.Add(item.ErrorMessage);
                }
                RaisePropChange(nameof(Errors));
            }
            RaisePropChange(nameof(NewDescription));
        }
    }
}
The view component uses these properties to change the class of the input field and show the validation errors when they are present.
Handling Asynchronous Operations
The viewmodel uses a simple method to notify when it is waiting on asynchronous operations to complete. I’ve used this pattern for a decade now and it works for 90% of the use cases. An operation simply increments a count when it begins, and decrements when completed. This way multiple parallel operations can work together and it simply changes state when they all complete. The main code to facilitate this is here:
private int _asyncCount = 0;

public bool Loading
{
    get => _asyncCount > 0;
}

private void StartAsyncOperation()
{
    var cur = Loading;
    _asyncCount++;
    if (cur != Loading)
    {
        RaisePropChange(nameof(Loading));
    }
}

private void EndAsyncOperation()
{
    var cur = Loading;
    _asyncCount--;
    if (cur != Loading)
    {
        RaisePropChange(nameof(Loading));
    }
}
The property changed notification is only raised if the Loading state changes. I could have even further wrapped asynchronous calls in a method that performs the increment/decrement automatically, but that felt like overkill. It’s easy enough to bookend the calls like this:
public async Task AddNewAsync()
{
    if (!string.IsNullOrWhiteSpace(NewDescription) && !ValidationHasErrors)
    {
        var newItem = new Todo { Description = NewDescription };
        StartAsyncOperation();
        await _dataAccess.AddAsync(newItem);
        EndAsyncOperation();
        NewDescription = string.Empty;
        RaisePropChange(nameof(TodosAsync));
    }
}
Notice it checks validation first, then awaits between starting and ending the operation.
Managing the List
The nice thing about property changed notifications is that they scope to a specific property. Instead of constantly fetching the new list, I can simply respond to changes that affect it. I made a helper method that conditionally raises the TodosAsync notification based on a simple flag.
private void RaisePropChange(string property, bool includeTodos = false)
{
    PropertyChanged?.Invoke(this, new PropertyChangedEventArgs(property));
    if (includeTodos)
    {
        PropertyChanged?.Invoke(this, new PropertyChangedEventArgs(nameof(TodosAsync)));
    }
}
Any of the filter options pass true and the view component listens for the event and fetches then new list accordingly.
After completing the viewmodel I was able to verify I had a working application. I tested adding, sorting, marking items complete and deleting them. With that working, the next step was to implement the ITodoDataAccess interface with a class that makes real OData calls. How difficult would that be?
The Simple OData Client
I had the opportunity to meet Vagif Abilov (@ooobject) when I was accepted to speak in St. Petersburg, Russia for an incredibly well-run conference called DotNext. I wrote a recap of the event here:

My recap of a visit to St. Petersburg, Russia to present Explore the Azure Cosmos DB at the DotNext conference. Includes video and slides.
Vagif coached me on what to expect from the international audience and provided valuable feedback to help me build my presentation. Little did I know I would come across his incredible work when I began looking for a simple OData client. As if he read my mind and went back in time, I landed very quickly on this solution that he maintains:
simple-odata-client/Simple.OData.Client
This client has everything I wanted. It inspects the metadata endpoint for the OData client, builds and internal model based on what is passed back, and exposes manual, fluent, and dynamic interfaces to everything. It’s easiest just to explain how I built the implementation of the service client that I named TodoSimpleOData.
First, because Blazor requires a specially configured version of the HttpClient that is aware of browser limitations, I take advantage of the client’s settings to pass in the instance I want to use. That instance, in turn, is passed into the service via dependency injection (it’s internally wired to be available to Blazor code).
public TodoSimpleOData(HttpClient client)
{
    client.BaseAddress = new Uri("http://localhost:5000/odata/");
    var settings = new ODataClientSettings(client);
    _client = new Simple.OData.Client.ODataClient(settings);
}
Here I’m hard coding the base URL address to keep the demo simple. You could set it up to read from standard .NET Core configuration settings and generate the endpoint as part of your build process. Also, I tend to run the OData client from the shell with a simple dotnet run that defaults to port 5000. If you run it as a startup project from Visual Studio, the port may be different so please keep that in mind and update accordingly.
Psssst I have a little secret. That endpoint is the only time I need to specify a URL or endpoint, ever. The client can request whatever entities are available, what their endpoints are and how to perform any operations against them automatically once it “knows” the base address. Wait and see for yourself!
Right now, I have a bunch of methods throwing “I’m not implemented” exceptions. To work with the list, I need to add new items, so I’ll do that first. I never trust that validation has already occurred, so most of this method is building a validation context and verifying the model is valid before passing it to the client (which in turn will further validate it on the server).
public async Task<Todo> AddAsync(Todo itemToAdd)
{
    var results = new List<ValidationResult>();
    var validation = new ValidationContext(itemToAdd);
    if (Validator.TryValidateObject(itemToAdd, validation, results))
    {
        return await _client.For<Todo>().Set(itemToAdd).InsertEntryAsync();
    }
    else
    {
        throw new ValidationException();
    }
}
That felt way too easy! The main code is right here:
return await _client.For<Todo>().Set(itemToAdd).InsertEntryAsync();
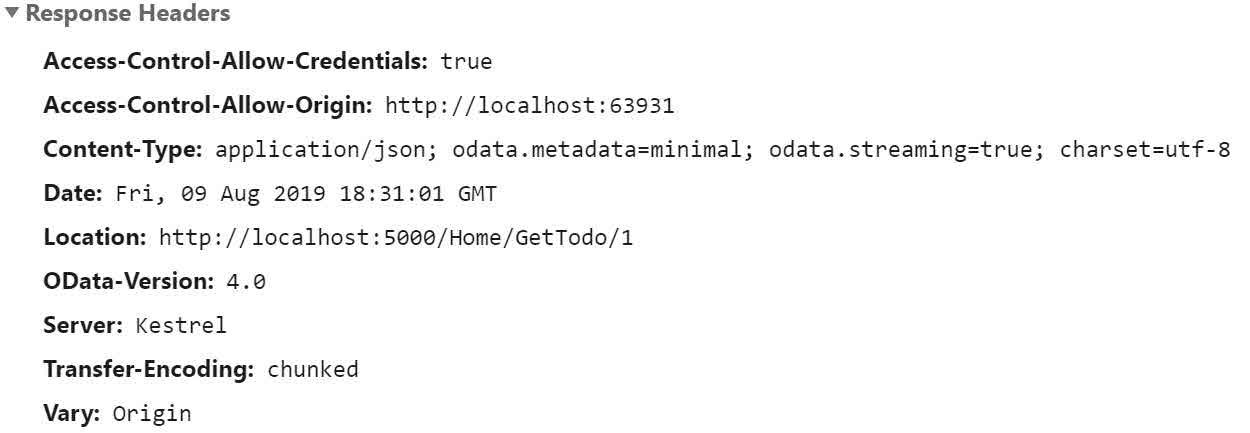
I can run that and look at my network activity to see what happened behind the scenes.
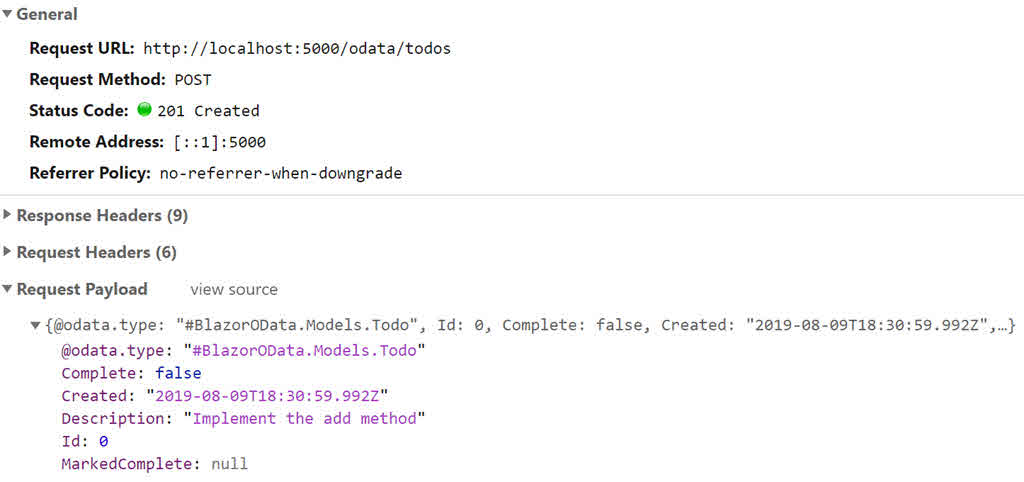
The response doesn’t return the object, but the headers provide the location of the newly created entity. This is how the simple OData client can return the updated version with a server-generated id.
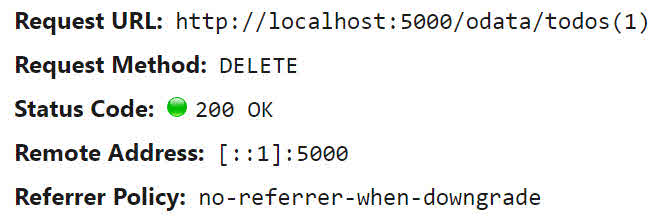
Cool. Let’s implement delete. Are you ready?
public async Task<bool> DeleteAsync(Todo item)
{
    await _client.For<Todo>().Key(item.Id).DeleteEntryAsync();
    return true;
}
I return true by default but for a production application would also capture errors, log them and return false when/if it fails. Running delete:
Finally, my favorite method to implement: the search. Here is the full implementation that considers the filtering and conditional ordering:
public async Task<IEnumerable<Todo>> GetAsync(
    bool showAll, bool byCreated, bool byCompleted)
{
    var helper = _client.For<Todo>();
    if (!showAll)
    {
        helper.Filter(todo => !todo.Complete);
    }
    if (showAll && byCompleted)
    {
        helper.OrderByDescending(todo => todo.MarkedComplete)
            .ThenByDescending(todo => todo.Created);
    }
    else if (byCreated)
    {
        helper.OrderByDescending(todo => todo.Created);
    }
    else
    {
        helper.OrderBy(todo => todo.Description);
    }
    return await helper.FindEntriesAsync();
}
Nice and fluent! Notice how I can conditionally chain options, just like any other LINQ over IQueryable interface. Here is the default query:

And the results. Note they are returned from the server in order and missing the “two” task that was already marked complete.
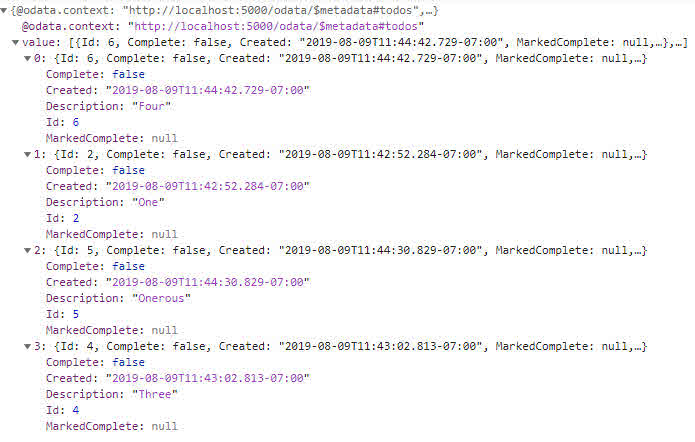
That’s just a simple example. If you dig into the client a bit deeper, you’ll find you can handle massive amounts of data and use things like skip and take or to enable paging.
Putting it all Together
The nice thing about dependency injection is that I can change the version of the service I register in Program.cs to go from “in memory” to live. The full repository is available online here:
This post demonstrated:
- Sharing a model, including business logic, between the client and server
- Using the same validation at multiple levels without having to rewrite it, anywhere
- Implementing an OData endpoint using some simple attributes on a special controller
- How to take advantage of dependency injection in Blazor clients
- A few newer Blazor features such as managing the attributes of an HTML element
- An example of the MVVM pattern in Blazor
- Dealing with asynchronous operations
- Using the simple OData client to manipulate data using a fluent C# interface
Want to learn more? I’m building an entire series of Blazor articles so be sure to check them out!
Watch another Blazor and OData video:
What are your thoughts, comments, and feedback? What would you like to see more of? Please share your comments below.
Regards,

Related articles:
- 2020: The Year of Data (.NET Core)
- Advanced Blazor: Shared Assemblies and Debugging from Edge (Web Development)
- An Easier Blazor Debounce (Blazor)
- Azure Cosmos DB With EF Core on Blazor Server (Blazor)
- GraphQL for .NET Developers (GraphQL)
- TypeScript for JavaScript Developers by Refactoring Part 1 of 2 (Web Development)