
Build a Blazor WebAssembly Line of Business App Part 1: Intro and Data Access
File, New, Enterprise Web App
Part of the series: Blazor and EF Core
Blazor WebAssembly is here and ready for production. It enables new scenarios for .NET developers to run existing code and libraries in the browser without a plugin. Blazor WebAssembly enables the creation of desktop, tablet, and mobile friendly apps with offline support as a Progressive Web Application (PWA). The built-in templates enable security for enterprise authentication and authorization scenarios. Although Blazor WebAssembly supports most .NET Standard class libraries out of the box, there are some constraints that exist due to the browser security model. For example, the raw TCP ports needed to connect directly to a SQL Server database aren’t available in the browser. That means the client must connect to data over an API.
I built the Blazor WebAssembly EF Core Example application as a learning tool and starting point for line of business applications. I wanted to go beyond a simple “Hello, World” demo and create an application that implements many features often found in line of business apps, like filtering and sorting, auditing and concurrency resolution. To get started with the application, visit the repo then follow the instructions. The rest of this blog post will explain the functionality and how it was implemented.
JeremyLikness/BlazorWasmEFCoreExample
To start with, I created an application with authentication.
Get Started: Authentication
There are several scenarios that Blazor WebAssembly supports for security. First, there is standalone Blazor WebAssembly. This handles the project as a typical standalone Single Page Application (SPA) that is deployed as a set of static assets that can be published through any web server. The second option is hosted that creates an ASP. NET Core application that can optionally host authentication as well as Web API endpoints to support the client application. These are the available options based on your hosting model:
| Authentication Provider | Standalone Option | Hosted Option |
|---|---|---|
| Authentication Library | Documentation | Not Available |
| Microsoft Accounts | Documentation | Not Available |
| Azure Active Directory | Documentation | Documentation |
| Azure AD B2C | Documentation | Documentation |
| Identity Server | Not Available | Documentation |
I chose to go with the Identity Server option so the example will work regardless of whether you have access to Azure AD. The app requires a backend, so the hosted ASP.NET Core option is perfect. I followed the directions in the linked document to create the application, verified it ran, then went to work customizing the app.
Extend Identity to Audit User Account Management
The Identity Server uses EF Core for data access. The template creates an ApplicationDbContext for access to the identity database. The built-in templates provide the ability to login, register, and “confirm” email via a web interface. In production apps, this can be customized to send an actual email confirmation. Many businesses require an audit trail of user activity. Fortunately, this is relatively straightforward to do in EF Core.
First, I created a new context named ApplicationAuditDbContext that inherits from ApplicationDbContext. I changed all of the registrations in Startup.cs to use this new context. This is why the app required you to create a new migration to get started instead of using the built-in migration that was generated by the template.
The UserAudit class represents an audit entry.
public class UserAudit
{
    public UserAudit()
    {
        EventTime = DateTimeOffset.UtcNow;
    }

    public UserAudit(string action, ApplicationUser user) : this()
    {
        UserId = user.Id;
        Username = user.UserName;
        Action = action;
    }
    public int Id { get; set; }

    public string UserId { get; set; }
    public DateTimeOffset EventTime { get; set; }
    public string Action { get; set; }
    public string Username { get; set; }
}
The AuditAdapter class exposes a Snap method to take a snapshot of a context. It takes an instance of ApplicationAuditDbContext as a parameter. EF Core has a built-in API for managing changes to objects. This is how it issues the correct database commands to handle any changes. For the audit, I’m interested in changes to the ApplicationUser class (either add, delete, or modified). This code looks specifically at ApplicationUser changes and filters on added, deleted, and modified statuses.
var tracker = context.ChangeTracker;
foreach (var item in tracker.Entries<ApplicationUser>())
{
    if (item.State == EntityState.Added ||
        item.State == EntityState.Deleted ||
        item.State == EntityState.Modified)
    {
        //do the right thing
    }
}
Each change tracker entry has a state and a snapshot of the entity. If the state is modified, I add an extra check to see if the EmailConfirmed field changes to specifically track that as a separate audit event.
var audit = new UserAudit(item.State.ToString(), item.Entity);
if (item.State == EntityState.Modified)
{
    var wasConfirmed =
        (bool)item.OriginalValues[nameof(ApplicationUser.EmailConfirmed)];
    if (wasConfirmed == false && item.Entity.EmailConfirmed == true)
    {
        audit.Action = "Email Confirmed";
    }
}
Finally, the audit entries are simply added to the context. This flags them as new, so when the context saves changes, it will update the user and insert the audit statements as part of the same save cycle.
context.Audits.AddRange(auditList);
The new context I created exposes the audit collection, then overrides SaveChangesAsync to intercept the operation, snapshot the changes, then save them.
public DbSet<UserAudit> Audits { get; set; }

public override Task<int> SaveChangesAsync(
    CancellationToken token = default)
{
    _adapter.Snap(this);
    return base.SaveChangesAsync(token);
}
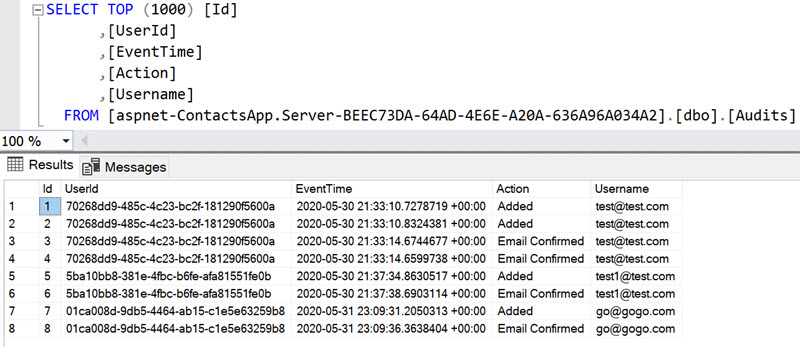
A quick peek at the database confirms this is working (the double entries for the hypothetical [email protected] account are from an earlier bug that was fixed):
Now that the basics of authentication and authorization are taken care of, it’s time to build the contacts domain.
The Contact Model and Data Annotations
I’m not a fan of creating too many projects for an application. There are some guidelines I use to maximize reusability and maintainability. I go with a “maximize surface area” approach and organize code into projects that can be shared as broadly as possible. The ContactsApp.Model project is a .NET Standard library, so it can be used in a variety of applications from web apps to desktop apps to mobile applications and edge devices. It doesn’t take on any dependencies other than the core data annotations project, so it can be used regardless of data access strategy.
The project structure ended up looking like this:
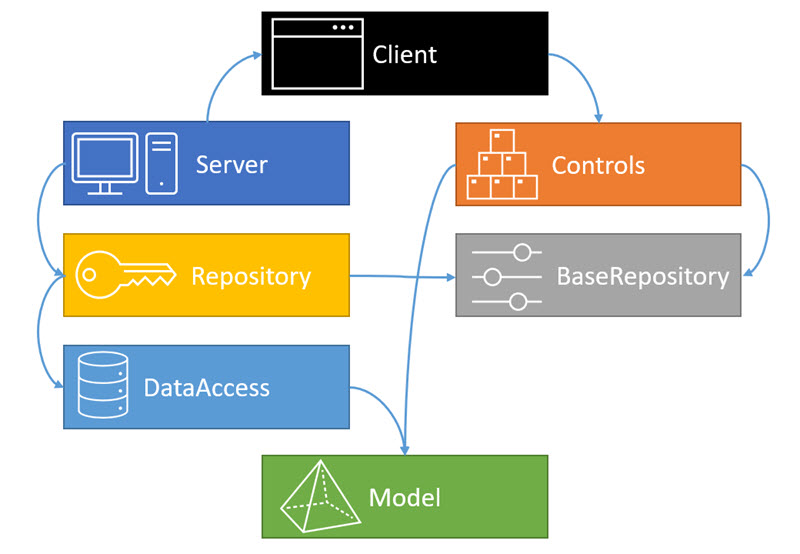
Notice that, as far as the client is concerned, it’s only dealing with a library of controls, a set of data access interfaces, and a model.
The main entity used in the application is a Contact. The definition of the class includes data annotations to describe some rules (business logic) for the various properties.
public class Contact
{
    public int Id { get; set; }

    [Required]
    [StringLength(100, ErrorMessage = "First name cannot exceed 100 characters.")]
    public string FirstName { get; set; }

    [StringLength(100, ErrorMessage = "Last name cannot exceed 100 characters.")]
    public string LastName { get; set; }

    [StringLength(15, ErrorMessage = "Phone number cannot exceed 15 digits.")]
    public string Phone { get; set; }

    [Required]
    [StringLength(100, ErrorMessage = "Street cannot exceed 100 characters.")]
    public string Street { get; set; }

    [Required]
    [StringLength(50, ErrorMessage = "City cannot exceed 50 characters.")]
    public string City { get; set; }

    [Required]
    [StringLength(3, ErrorMessage = "State abbreviation cannot exceed 3 characters.")]
    public string State { get; set; }

    [Required]
    [RegularExpression(@"^\d{5}(?:[-\s]\d{4})?$", ErrorMessage = "Enter a valid zipcode in 55555 or 55555-5555 format")]
    public string ZipCode { get; set; }
}
A production application may have more complex rules and perform actions like address validation. I did not want to make the example too complicated but did want to include some rules to show how it works on the client and the server.
The project also contains definitions for the properties to filter or sort on (ContactFilterColumns enumeration), the filter (IContactFilters) and a “page helper” interface (IPageHelper) that holds paging state and performs the math necessary to skip and take the correct entries for a “page.” All of these classes are documented so they should be straightforward to understand.
Data Access with Entity Framework Core
The next project, ContactApps.DataAccess, has a reference to EF Core. It does not reference a specific provider and doesn’t use any database-specific references so it can potentially be reused for MySQL, PostgreSQL, SQLite, or Oracle (Cosmos DB requires some manual management of keys, so that would take some tweaks). Here is a full list of supported EF Core providers. The project is also a .NET Standard class library that can run on multiple platforms from Blazor and ASP.NET Core to Xamarin for mobile. This is an opinionated library as it couples to EF Core for the data access strategy.
⭐ Note: although placing the context in a separate assembly promotes reusability, it does come with caveats if you choose to do migrations. That will be addressed later in this post.
Here is the basic structure of the DbContext defined (think of this as a unit of work for interacting with the database).
public class ContactContext : DbContext, ISupportUser
{
    public static readonly string BlazorContactsDb =
        nameof(BlazorContactsDb).ToLower();

    public ContactContext(DbContextOptions<ContactContext> options)
        : base(options)
    {
    }

    public DbSet<Contact> Contacts { get; set; }
}
The project has some extra code to set an _id property and intercepts Dispose as a debugging tool. It provides information about when a context is created and disposed.
The database name is exposed so any references are consistent and to provide a simple way to refactor the name if you wish to change it. The constructor takes in an options instance so that it can be configured at runtime. This is how the provider is specified at runtime and settings like connection strings are passed in.
Although it’s not necessary for this project, the repository pattern I’ll describe later uses the data context in a way that will also work for Blazor Server. Our guidance is to use one context per operation whenever possible. The context is lightweight and instantiates quickly. There are some cases that require a longer-lived context, such as when you want to use the context for change tracking and/or concurrency resolution. To make it easier to generate new contexts with configuration, I created a factory class that handles creation of a new context along with any dependencies that may have been configured.
public class DbContextFactory<TContext> where TContext : DbContext
{
    private readonly IServiceProvider _provider;

    public DbContextFactory(IServiceProvider provider)
    {
        _provider = provider;
    }

    public TContext CreateDbContext()
    {
        if (_provider == null)
        {
            throw new InvalidOperationException($"You must configure an instance of IServiceProvider");
        }

        return ActivatorUtilities.CreateInstance<TContext>(_provider);
    }
}
This works for the reference project but for broader use should implement an interface so that users can create their own versions for testing and performance. For example, it may be fine to simply use new to create a new instance and pass in options. That will be significantly faster than resolving service dependencies. If you want to see the “production-ready” implementation of the factory, take a look at this pull request.
The context-per operation pattern then looks like this:
using (var context = _factory.CreateDbContext())
{
   context.Entities.Add(newEntity);
   await context.SaveChangesAsync();
}
To register the factory, I created an extension method in FactoryExtensions.
public static class FactoryExtensions
{
    public static IServiceCollection AddDbContextFactory<TContext>(
        this IServiceCollection collection,
        Action<DbContextOptionsBuilder> optionsAction = null,
        ServiceLifetime contextAndOptionsLifetime = ServiceLifetime.Singleton)
        where TContext : DbContext
    {
        collection.Add(new ServiceDescriptor(
            typeof(DbContextFactory<TContext>),
            sp => new DbContextFactory<TContext>(sp),
            contextAndOptionsLifetime));

        collection.Add(new ServiceDescriptor(
            typeof(DbContextOptions<TContext>),
            sp => GetOptions<TContext>(optionsAction, sp),
            contextAndOptionsLifetime));

        return collection;
    }

    private static DbContextOptions<TContext> GetOptions<TContext>(
        Action<DbContextOptionsBuilder> action,
            IServiceProvider sp = null) where TContext : DbContext
    {
        var optionsBuilder = new DbContextOptionsBuilder<TContext>();
        if (sp != null)
        {
            optionsBuilder.UseApplicationServiceProvider(sp);
        }
        action?.Invoke(optionsBuilder);
        return optionsBuilder.Options;
    }
}
The solution registers the factory and the options with a default singleton scope (one copy application-wide). If your application requires a different configuration per user (for example, administrative users use a different connection string compared to other users), you can register the factory in the scoped scope. This will re-evaluate the options configuration each time the factory is requested by the controller for a different user, in case there may be different connection string settings. The server project registers the factory and options like this in Startup.cs:
services.AddDbContextFactory<ContactContext>(opt =>
opt.UseSqlServer(
    Configuration.GetConnectionString(ContactContext.BlazorContactsDb))
.EnableSensitiveDataLogging());
This uses SQL Server for the provider, passes the connection string that is named the same as the database, and enables sensitive data logging.
⭐ Tip: as per the previous note, the
ContactContextexists in a class library that cannot be executed directly. If you want to use migrations, you must pass an executable project that references the context. I created theContactContextFactoryclass inContactApps.Serverto provide design-time hints for building migrations. This is an example command that specifies the startup and context:
dotnet ef migrations add --startup-project ContactsApp/Server --context ContactContext InitialContact
The result will be a migration named
InitialContactin theMigrationsfolder of theContactApps.Serverproject.
Logging
By default, the project configures the contact context to use sensitive data logging. This enables the logs to pick up generated SQL. The appsettings.Development.json configuration file contains this logging block:
"Logging": {
    "LogLevel": {
        "Default": "Information",
        "Microsoft": "Warning",
        "Microsoft.Hosting.Lifetime": "Information",
        "Microsoft.EntityFrameworkCore.Database.Command": "Information"
    }
}
The caveat is, of course, that generated SQL may contain sensitive data that you don’t want in your logs. It is enabled here for demo purposes.
The combination of the sensitive data logging and setting the EF Core entry to information results in the generated SQL being output to the logs. For local development, it can help with troubleshooting and understanding the queries. For example, it removes any doubt that filters and paging are happening in-memory. This is the SQL generated for a new page request with a filter:
--Executed DbCommand (7ms) [Parameters=[@___controls_FilterText_0='quartz' (Size = 100)],
--CommandType='Text', CommandTimeout='30']

SELECT COUNT(*)
FROM [Contacts] AS [c]
WHERE ((@___controls_FilterText_0 = N'') OR
         (CHARINDEX(@___controls_FilterText_0, [c].[FirstName]) > 0))
    OR
      ((@___controls_FilterText_0 = N'') OR
         (CHARINDEX(@___controls_FilterText_0, [c].[LastName]) > 0))

--Executed DbCommand (6ms) [Parameters=[@___controls_FilterText_0='quartz' (Size = 100),

--@__p_1='0', @__p_2='20'], CommandType='Text', CommandTimeout='30']

SELECT [c].[Id], [c].[City], [c].[CreatedBy], [c].[CreatedOn], [c].[FirstName],
    [c].[LastName], [c].[ModifiedBy], [c].[ModifiedOn], [c].[Phone], [c].[RowVersion],
    [c].[State], [c].[Street], [c].[ZipCode]
FROM [Contacts] AS [c]
WHERE ((@___controls_FilterText_0 = N'') OR
         (CHARINDEX(@___controls_FilterText_0, [c].[FirstName]) > 0))
    OR
      ((@___controls_FilterText_0 = N'') OR
         (CHARINDEX(@___controls_FilterText_0, [c].[LastName]) > 0))
ORDER BY [c].[LastName]
OFFSET @__p_1 ROWS FETCH NEXT @__p_2 ROWS ONLY
A count and a set of rows are returned based on the current page, the page size, and the name filter that is passed in.
Repository Pattern and Server Implementation
It is not always necessary to create a data service to wrap EF Core. The data context itself is testable. You can read more at: testing code that uses EF Core. I decided to use a repository pattern because it provides a consistent interface for data access on both the client and the server. It also allows Razor components to reference the interface without relying on the implementation, so the components work equally well in Blazor WebAssembly and Blazor Server apps. In fact, all of the components in this solution will work “as is” in a Blazor Server app.
There are many implementations of the repository pattern. I chose to go with a simple approach: a repository that supports multiple operations, and a unit of work concept that extends the repository. All operations use their own short-lived context unless a unit of work is created that “captures” a context for the duration of the work. The unit of work implements IDisposable because it is long-lived and may hold onto resources. The basic unit of work interface lives in the ContactsApp.BaseRepository project and looks like this (I added a special interface to pass in the authenticated user, more on that in a bit):
public interface IUnitOfWork<TEntity> : IDisposable
{
    IBasicRepository<TEntity> Repo { get; }
    void SetUser(ClaimsPrincipal user);
    Task CommitAsync();
}
Some implementations also provide a RollbackAsync() method. The unit of work references the basic repository interface:
public interface IBasicRepository<TEntity>
{
    Task QueryAsync(Func<IQueryable<TEntity>, Task> query);
    Task<ICollection<TEntity>> GetListAsync();
    Task<TEntity> LoadAsync(int id, ClaimsPrincipal user, bool forUpdate = false);
    Task<bool> DeleteAsync(int id, ClaimsPrincipal user);
    void Attach(TEntity item);
    Task<TEntity> AddAsync(TEntity item, ClaimsPrincipal user);
    Task<TEntity> UpdateAsync(TEntity item, ClaimsPrincipal user);
    Task<TPropertyType> GetPropertyValueAsync<TPropertyType>(
            TEntity item, string propertyName);
    Task SetOriginalValueForConcurrencyAsync<TPropertyType>(
        TEntity item, string propertyName, TPropertyType value);
}
The first method may look confusing at first, but it’s designed to provide an extensible way to query with LINQ that doesn’t rely on Entity Framework Core. The context exposes a DbSet<TEntity> that must be cast to queryable. The QueryAsync method is implemented by the repository and expects a function it can call back to with an IQueryable<TEntity> instance that is awaitable. This allows the repo to pass the queryable back, without exposing the mechanism, so you could just as easily cast a list to the query as a database table.
An example call would look like this:
await _repo.QueryAsync(
    async query => contacts = await query
        .Where(c => c.FirstName == "Jeremy")
        .OrderBy(c => c.City).ToListAsync());
The call gets passed back a queryable, which then is filtered and sorted, cast to a list, then assigned to a collection. We’ll break that down a little more in a minute.
The rest of the methods should make sense. They address adding, deleting, etc. Attach is a special way of saying “start watching this entity” for things like change detection or concurrency resolution. The GetPropertyValueAsync and SetOriginalValueForConcurrencyAsync are used to access shadow properties and manage concurrency. I’ll cover more on those in a later section.
Don’t worry, I haven’t overlooked the RepoConcurrencyException. It will make a lot more sense later on.
Implement the Repository
The implementation of the repository pattern must be able to handle a context-per-request as well as a long-lived context for longer running transactions. Therefore, a more specialized version of the IBaseRepository interface is defined in the ContactsApp.Repository project. IRepository is solely used by the UnitOfWork to manage the longer-lived context.
Here is the interface:
public interface IRepository<TEntity, TContext>:
        IDisposable,
        IBasicRepository<TEntity> where TContext: DbContext, ISupportUser
{
    TContext PersistedContext { get; set;  }
}
ISupportUser defines a ClaimsPrincipal property and indicates the implementation supports setting a user property for audit purposes. The UnitOfWork implementation looks like this:
public class UnitOfWork<TContext, TEntity> :
        IUnitOfWork<TEntity>
        where TContext: DbContext, ISupportUser
{
    private IRepository<TEntity, TContext> _repo;
    public IBasicRepository<TEntity> Repo
    {
        get => _repo;
    }
    public UnitOfWork(
        IRepository<TEntity, TContext> repo, DbContextFactory<TContext> factory)
    {
        repo.PersistedContext = factory.CreateDbContext();
        _repo = repo;
    }
    public async Task CommitAsync()
    {
       // stay tuned ...
    }
    public void Dispose()
    {
        if (_repo != null)
        {
            _repo.Dispose();
            _repo = null;
        }
    }

    public void SetUser(ClaimsPrincipal user)
    {
        if (_repo.PersistedContext != null)
        {
            _repo.PersistedContext.User = user;
        }
    }
}
Notice that the public interface exposes the repository as IBasicRepository<TEntity> but internally it is defined as IRepository<TEntity, TContext>.
The unit of work relies on a repository that it tracks the context for. Here is the server implementation of ContactRepository (which, by implementing IRepository automatically implements IBasicRepository):
public class ContactRepository : IRepository<Contact, ContactContext>
{
    private readonly DbContextFactory<ContactContext> _factory;
    private bool disposedValue;

    public ContactContext PersistedContext { get; set; }

    public ContactRepository(DbContextFactory<ContactContext> factory)
    {
        _factory = factory;
    }

    private async Task WorkInContextAsync(
        Func<ContactContext, Task> work,
        ClaimsPrincipal user,
        bool saveChanges = false)
    {
        if (PersistedContext != null)
        {
            if (user != null)
            {
                PersistedContext.User = user;
            }
           await work(PersistedContext);
        }
        else
        {
            using (var context = _factory.CreateDbContext())
            {
                context.User = user;
                await work(context);
                if (saveChanges)
                {
                    await context.SaveChangesAsync();
                }
            }
        }
    }

    public void Attach(Contact item)
    {
        if (PersistedContext == null)
        {
            throw new InvalidOperationException("Only valid in a unit of work.");
        }
        PersistedContext.Attach(item);
    }

    public async Task<Contact> AddAsync(Contact item, ClaimsPrincipal user)
    {
        await WorkInContextAsync(context =>
        {
            context.Contacts.Add(item);
            return Task.CompletedTask;
        }, user, true);
        return item;
    }

    public async Task<bool> DeleteAsync(int id, ClaimsPrincipal user)
    {
        bool? result = null;
        await WorkInContextAsync(async context =>
        {
            var item = await context.Contacts.SingleOrDefaultAsync(c => c.Id == id);
            if (item == null)
            {
                result = false;
            }
            else
            {
                context.Contacts.Remove(item);
            }
        }, user, true);
        if (!result.HasValue)
        {
            result = true;
        }
        return result.Value;
    }

    public Task<ICollection<Contact>> GetListAsync()
    {
        throw new NotImplementedException();
    }

    public async Task<Contact> LoadAsync(
        int id,
        ClaimsPrincipal user,
        bool forUpdate = false)
    {
        Contact contact = null;
        await WorkInContextAsync(async context =>
        {
            var contactRef = context.Contacts;
            if (forUpdate)
            {
                contactRef.AsNoTracking();
            }
            contact = await contactRef
                .SingleOrDefaultAsync(c => c.Id == id);
        }, user);
        return contact;
    }

    public async Task QueryAsync(Func<IQueryable<Contact>, Task> query)
    {
        await WorkInContextAsync(async context =>
        {
            await query(context.Contacts.AsNoTracking().AsQueryable());
        }, null);
    }

    public async Task<Contact> UpdateAsync(Contact item, ClaimsPrincipal user)
    {
        await WorkInContextAsync(context =>
        {
            context.Contacts.Attach(item);
            return Task.CompletedTask;
        }, user, true);
        return item;
    }

    protected virtual void Dispose(bool disposing)
    {
        if (!disposedValue)
        {
            if (disposing)
            {
                if (PersistedContext != null)
                {
                    PersistedContext.Dispose();
                }
            }
            disposedValue = true;
        }
    }

    public void Dispose()
    {
        Dispose(disposing: true);
        GC.SuppressFinalize(this);
    }
}
The main method to unpack is the WorkInContextAsync. If a long-lived context exists, this will run the operation against that context. Otherwise, it will create a short-lived context for the operation using the factory. It’s a way of managing similar workloads in different contexts. The persisted context will only exist if the repo is injected into a unit of work, and when the unit of work is disposed, the repository is disposed, which in turn disposes the context. Most operations (read, query, etc.) are fine using the pattern of a new context per operation, but what about an update with potential concurrency conflicts?
In a desktop application, or a solution like Blazor Server, EF Core will automatically track the entities as long as the context exists. This means you can load an entity, modify it, then save changes and if there is a concurrency conflict, an exception is thrown. With Blazor WebAssembly, however, the server must operate in a disconnected state: the load happens separately from the update. To handle this, I use shadow properties. Before jumping into concurrency, let’s look at our controller and explore some more features.
Continue to the next section:
Part 2 of the series that describes a fully functional real-world project built in Blazor WebAssembly with EF Core. Part 2 focuses on the Web API, shadow properties, automation of audit, and the repository implementation.
Regards,

Part of the series: Blazor and EF Core
- EF Core and Cosmos DB with Blazor WebAssembly
- Azure AD Secured Serverless Cosmos DB from Blazor WebAssembly
- Build a Blazor WebAssembly Line of Business App Part 1: Intro and Data Access
- Build a Blazor WebAssembly Line of Business App Part 2: Client and Server
- Build a Blazor WebAssembly Line of Business App Part 3: Query, Delete and Concurrency
- Build a Blazor WebAssembly LOB App Part 4: Make it Blazor-Friendly
- Build an Azure AD Secured Blazor Server Line of Business App