
Build a Blazor WebAssembly Line of Business App Part 2: Client and Server
File, New, Enterprise Web App
Part of the series: Blazor and EF Core
I built the Blazor WebAssembly EF Core Example application as a learning tool and starting point for line of business applications. I wanted to go beyond a simple “Hello, World” demo and create an application that implements many features often found in line of business apps, like filtering and sorting, auditing and concurrency resolution. To get started with the application, visit the repo then follow the instructions. The rest of this blog post will explain the functionality and how it was implemented.
JeremyLikness/BlazorWasmEFCoreExample
This is part 2 of the series the explores the project and how it was built. This post covers Web API, shadow properties, automation of audit, and the repository implementation. If you haven’t read the first part, it is available here:

Describes a fully functional real-world project built in Blazor WebAssembly with EF Core that demonstrates authentication, logging, shadow properties, auditing, optimistic concurrency, entity validation, paging/sorting/filtering and more.
The Web API to Create/Read
Now that our repository is implemented, it is injected into the ContactsController:
[Route("api/[controller]")]
[ApiController]
[Authorize]
public class ContactsController : ControllerBase
{
    private readonly IBasicRepository<Contact> _repo;
    private readonly IServiceProvider _serviceProvider;

    public ContactsController(IBasicRepository<Contact> repo,
        IServiceProvider provider)
    {
        _repo = repo;
        _serviceProvider = provider;
    }
}
Notice it uses the basic “context-ignorant” interface (IBasicRepository vs IRepository). This makes testing easier and follows the approach of using only what is needed. The registration is in the server project’s Startup.cs. This registration ensures the same repo is returned in the given scope regardless of the interface requested. It is registered using IRepository then a second registration for IBasicRepository uses the service provider to resolve the first registration.
services.AddScoped<
    IRepository<Contact, ContactContext>, ContactRepository>();
services.AddScoped<
    IBasicRepository<Contact>>(sp =>
        sp.GetService<IRepository<Contact, ContactContext>>());
The basic GET or read of a single contact looks like this:
[HttpGet("{id}")]
public async Task<IActionResult> Get(int id,
    [FromQuery] bool forUpdate = false)
{
    if (id < 1)
    {
        return new NotFoundResult();
    }
    if (forUpdate)
    {
        // concurrency stuff for later
    }
    else
    {
        var result = await _repo.LoadAsync(id, User);
        return result == null ? (IActionResult)new NotFoundResult() :
            new OkObjectResult(result);
    }
}
This should be straightforward. There is a parameter that specifies whether it’s for an update operation. That will be covered in a later section focused on concurrency. The logic attempts to load a contact and either returns it as a 200-OK or, if it doesn’t exist, resolves to 404-Not Found.
Let’s add a contact:
[HttpPost]
public async Task<IActionResult> PostAsync(
    [FromBody] Contact contact)
{
    return contact == null
        ? new BadRequestResult()
        : ModelState.IsValid ?
        new OkObjectResult(await _repo.AddAsync(contact, User)) :
        (IActionResult)new BadRequestObjectResult(ModelState);
}
Again, not too complicated. The contact must exist, and because it uses data annotations it is also possible to check the ModelState. If there are issues like missing properties, strings that are too long, etc. the model will be invalid. Otherwise, the repo adds the contact and returns the new contact with the Id populated. The controller is secured, so the ClaimsPrincipal property should be populated and is passed into the repo. What do we do with that?
Shadow Properties: Audit and Versioning
The table for Contact has several additional properties that aren’t present on the C# class. The properties could be added if they need to be displayed in the UI or referenced in other code. The additional properties are mostly for audit and concurrency purposes, so there isn’t really a need for them to “live” outside of the data access layer. Fortunately, EF Core has a method to map additional properties without changing the class: shadow properties.
The ContactContext context defines these property names:
public static readonly string RowVersion = nameof(RowVersion);
public static readonly string CreatedBy = nameof(CreatedBy);
public static readonly string CreatedOn = nameof(CreatedOn);
public static readonly string ModifiedBy = nameof(ModifiedBy);
public static readonly string ModifiedOn = nameof(ModifiedOn);
The RowVersion property is a special database column that changes with every update. This makes it easy to see if a particular entry has been modified since it was last loaded. The other fields track the user id and timestamp of the logged in user that created the entry and the last logged in user to modify it. These audits are reinforced by a dedicated audit table that tracks each transaction, user id, and a before/after snapshot of the entity.
To configure the properties in EF Core, the context overrides OnModelBuilding:
protected override void OnModelCreating(ModelBuilder modelBuilder)
{
    var contact = modelBuilder.Entity<Contact>();
    contact.Property<byte[]>(RowVersion).IsRowVersion();
    contact.Property<string>(ModifiedBy);
    contact.Property<DateTimeOffset>(ModifiedOn);
    contact.Property<string>(CreatedBy);
    contact.Property<DateTimeOffset>(CreatedOn);
    base.OnModelCreating(modelBuilder);
}
Now EF Core will read/write to those properties and save them in an internal representation. The ContactRepository implements the methods to interact with shadow properties. For reference, here’s the code to retrieve a value:
value = context.Entry(item)
    .Property<TPropertyType>(propertyName).CurrentValue;
The developer consuming the repository doesn’t have to worry about these values. They are all managed “behind the scenes.”
For the audit table, an audit class named ContactAudit is defined in ContactsApp.DataAccess:
public class ContactAudit
{
    public int Id { get; set; }
    public DateTimeOffset EventTime { get; set; }
        = DateTimeOffset.UtcNow;
    public int ContactId { get; set; }
    public string User { get; set; }
    public string Action { get; set; }
    public string Changes { get; set; }

    [NotMapped]
    public Contact ContactRef { get; set; }
}
Although this example is specifically typed for the Contact entity, I built the audit code to be more generic so it can be easily extended. For example, you could rename ContactId to EntityId and add a “type” property to handle multiple entities in the same table. The table is configured as ContactAudits on the context.
Automate the Contact Audit
The ContactContext overrides SaveChangesAsync to use an adapter that handles auditing.
public override async Task<int> SaveChangesAsync(CancellationToken token
            = default)
{
    return await _adapter.ProcessContactChangesAsync(
        User, this, async () => await base.SaveChangesAsync(token));
}
Notice that the User property is passed. This is configured because the context implements ISupportUser to store the ClaimsPrincipal currently logged in.
The ContactAuditAdapter implements the audit logic. The first step is to retrieve the “name” (unique identifier) of the logged in user. This code defaults to “Unknown” when the claim is not present, but it would also make sense to throw an exception. Testing shouldn’t be a problem because you can create a test principal to pass in.
public async Task<int> ProcessContactChangesAsync(
            ClaimsPrincipal currentUser,
            ContactContext context,
            Func<Task<int>> saveChangesAsync)
{
    var user = Unknown;
    if (currentUser != null)
    {
        var name = currentUser.Claims.FirstOrDefault(
            c => c.Type == ClaimTypes.NameIdentifier);
        if (name != null)
        {
            user = name.Value;
        }
    }
    // do stuff
}
The adapter then creates a list to hold audit information and iterates through changes to update the user audit information. If the entity is added, for example, the “created” columns are set.
foreach (var item in context.ChangeTracker.Entries<Contact>())
{
    if (item.State == EntityState.Modified ||
        item.State == EntityState.Added ||
        item.State == EntityState.Deleted)
    {
        if (item.State == EntityState.Added)
        {
            item.Property<string>(ContactContext.CreatedBy).CurrentValue =
                user;
            item.Property<DateTimeOffset>(ContactContext.CreatedOn).CurrentValue =
                DateTimeOffset.UtcNow;
        }

        Contact dbVal = null;

        if (item.State == EntityState.Modified)
        {
            var db = await item.GetDatabaseValuesAsync();
            dbVal = db.ToObject() as Contact;
            item.Property<string>(ContactContext.ModifiedBy).CurrentValue =
                user;
            item.Property<DateTimeOffset>(ContactContext.ModifiedOn).CurrentValue =
                DateTimeOffset.UtcNow;
        }
    }
}
The call to GetDatabaseValuesAsync grabs a snapshot of the properties as they currently exist in the database. The EF Core helper method ToObject() creates a full Contact entity from the properties. This will help with creating the snapshot. The snapshot itself uses a class named PropertyChanges to help with the diff (before and after):
public class PropertyChanges<TEntity> where TEntity : class
{
    public string Type => typeof(TEntity).FullName;
    public TEntity Original { get; set; }
    public TEntity New { get; set; }

    public PropertyChanges(EntityEntry<TEntity> entityEntry,
        TEntity dbVal = default)
    {
        if (entityEntry.State == EntityState.Added ||
            entityEntry.State == EntityState.Modified)
        {
            New = entityEntry.Entity;
        }
        if (entityEntry.State == EntityState.Deleted ||
            entityEntry.State == EntityState.Modified)
        {
            Original = dbVal ??
                entityEntry.OriginalValues.ToObject() as TEntity;
        }
    }
}
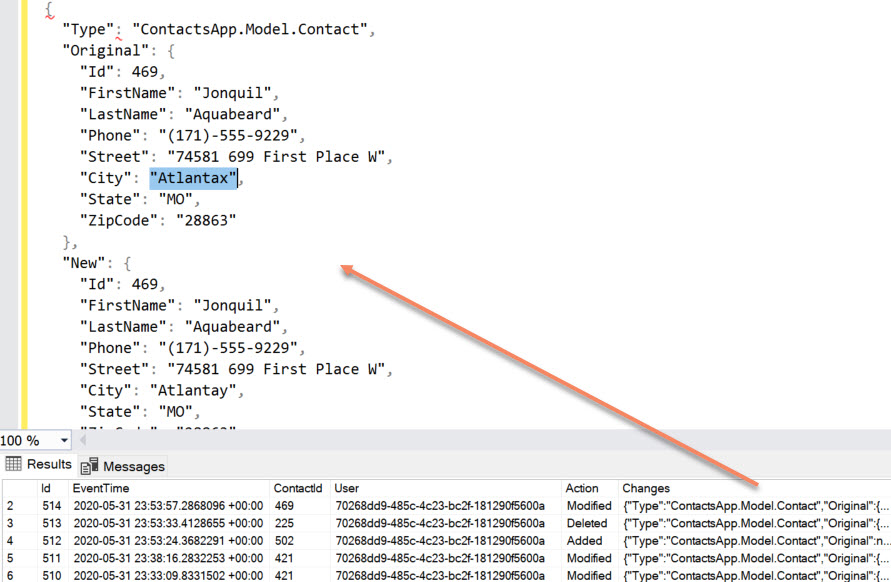
The class is designed so that serialization will automatically capture the snapshot. It will look like:
{
   "Type": "ContactsApp.Model.Contact",
    "Original": {"Id": 1, "Foo": null},
    "New": {"Id": 1, "Foo": "Bar"}
}
This is how the audit class is populated:
var changes = new PropertyChanges<Contact>(item, dbVal);
var audit = new ContactAudit
{
    ContactId = item.Entity.Id,
    Action = item.State.ToString(),
    User = user,
    Changes = JsonSerializer.Serialize(changes),
    ContactRef = item.Entity
};

audits.Add(audit);
Notice the Changes property is the serialized diff helper.
After processing changes, the audits are added to the current context. The base SaveChangesAsync() method is called. The result is that the updates and the audits are all processed in a single batch. There is one more step, however. Currently, the audit shows “0” for the Id of newly inserted contacts because the database assigns the value during the save operation. To fix this, a second pass picks up the inserted ids and updates the corresponding audit entries.
var secondSave = false;
foreach (var audit in audits.Where(a => a.ContactId == 0).ToList())
{
    secondSave = true;
    audit.ContactId = audit.ContactRef.Id;
    context.Entry(audit).State = EntityState.Modified;
}
if (secondSave)
{
    await saveChangesAsync();
}
Here is the result, with the JSON pasted and formatted for illustration.
The Web API is ready to go and it’s time to visit the Blazor client app.
Implement Repository on the Client
The client uses the ContactApps.Controls project, which in turn relies on an implementation of IBaseRepository<T>. This allows the Razor library to be shared across projects, including Blazor Server projects. For the server project, you simply register the server implementation of the repository. For the client, you change the implementation to make the API call instead of a database call.
Because the application implements security, the template by default referenced the IHttpClientFactory to create a named client. Instead of injecting the default HttpClient, the factory makes it possible to configure a client that is requested by name. To acquire a named client, you inject the factory and ask it to create the named client. Here is the client and factory registration:
builder.Services.AddHttpClient(BaseClient,
    client =>
    client.BaseAddress = new Uri(builder.HostEnvironment.BaseAddress))
    .AddHttpMessageHandler<BaseAddressAuthorizationMessageHandler>();

builder.Services.AddTransient(sp =>
    sp.GetRequiredService<IHttpClientFactory>()
    .CreateClient(BaseClient));
There are a few things happening here. The client is named “ContactsApp.ServerAPI” based on the definition of the BaseClient constant. It is configured with the base address of the host, meaning it will call the Web API endpoint based on the hosted URL. The code that uses the client can use relative paths and not worry about resolving the full address. A message handler was also added. This one happens to be tied into authentication and ensures all calls are made with the proper authentication headers so that the server can pick up the user’s logged in identity.
Here is how the repository is implemented and the client consumed.
public class WasmRepository : IBasicRepository<Contact>
{
    private readonly HttpClient _apiClient;
    private readonly GridControls _controls;

    private const string ApiPrefix = "/api/";
    private string ApiContacts => $"{ApiPrefix}contacts/";
    private string ApiQuery => $"{ApiPrefix}query/";
    private string ForUpdate => "?forUpdate=true";

    private async Task<TEntity> SafeGetFromJsonAsync<TEntity>(string url)
    {
        var result = await _apiClient.GetAsync(url);
        if (result.StatusCode == HttpStatusCode.NotFound)
        {
            return default;
        }
        result.EnsureSuccessStatusCode();
        return await result.Content.ReadFromJsonAsync<TEntity>();
    }

    public WasmRepository(IHttpClientFactory clientFactory, GridControls controls)
    {
        _apiClient = clientFactory.CreateClient(Program.BaseClient);
        _controls = controls;
    }

    public async Task<Contact> AddAsync(Contact item, ClaimsPrincipal user)
    {
        var result = await _apiClient.PostAsJsonAsync(ApiContacts, item);
        return await result.Content.ReadFromJsonAsync<Contact>();
    }

    // lots more code
}
The constructor takes in the client factory and requests the named client instance. It also grabs a reference to the GridControls class that I’ll describe in more detail later. Calling the built-in JSON extension methods throws a hard error when the resource is not found (404). I wrote SafeGetFromJsonAsync to return null for “not found” errors and throw on any other non-success code. This is called from AddAsync and issues the request to the server using the client. The server uses the EF Core implementation of the repository and inserts the new contact into the database table.
The loop is now closed: the client has an implementation to call the server, and the server calls the database. Next, the app needs some UI to make it all work. It’s time to look at ContactsApp.Controls.
Shared UI and Data Validation on the Client
As I mentioned earlier, the Controls project is a Razor class library that can be shared across projects. It contains an embedded CSS file in wwwroot\contacts.css that is referenced for a consistent style across apps. The Grid namespace contains some classes that make it easier for the application components to work together. GridControls is an implementation of IContactFilters that exposes an event that is fired whenever a filter or sorting option changes.
OK, I admit it. It’s property change notification, but I shied away from INotifyPropertyChanged because I will address MVVM in a separate project.
public class GridControls : IContactFilters
{
    private bool _showFirstNameFirst;
    private ContactFilterColumns _sortColumn = ContactFilterColumns.Name;
    private ContactFilterColumns _filterColumn = ContactFilterColumns.Name;
    private string _filterText;
    private bool _sortAscending = true;
    private bool _loading;

    public IPageHelper PageHelper { get; set; } = new PageHelper();

    public delegate void GridUpdateHandler(object sender, PropertyChangedEventArgs e);

    public event GridUpdateHandler OnGridControlsChanged;

    public bool Loading
    {
        get => _loading;
        set
        {
            if (_loading != value)
            {
                _loading = value;
                GridControlsChanged(nameof(Loading));
            }
        }
    }
    // more property getters and setters
}
The GridControlsBase is a class that components inherit from to automatically subscribe to changes to the filter. It grabs a reference to the GridControls instance that is shared across the client app and listens for changes.
public class GridControlsBase : ComponentBase, IDisposable
{
    private bool _disposedValue;

    [Inject]
    public GridControls Controls { get; set; }

    protected virtual Predicate<string> PropertyFilter { get; } = str => true;

    protected virtual Task OnGridChangedAsync(string propertyName)
    {
        return Task.CompletedTask;
    }

    protected override void OnInitialized()
    {
        Controls.OnGridControlsChanged += Controls_OnGridControlsChanged;
    }

    private async void Controls_OnGridControlsChanged(object sender, PropertyChangedEventArgs e)
    {
        if (PropertyFilter(e.PropertyName))
        {
            await InvokeAsync(() => StateHasChanged());
        }
        await OnGridChangedAsync(e.PropertyName);
    }

    protected virtual void Dispose(bool disposing)
    {
        if (!_disposedValue)
        {
            if (disposing)
            {
                Controls.OnGridControlsChanged -= Controls_OnGridControlsChanged;
            }

            _disposedValue = true;
        }
    }

    public void Dispose()
    {
        Dispose(disposing: true);
        GC.SuppressFinalize(this);
    }
}
The base implements IDisposable so it can unhook the event listener to prevent memory leaks. The abstract Predicate property is overridden to determine whether the control is automatically re-rendered when the filters change. By default, it will refresh for any property, but a simple override can return true for just the property that impacts that control. Components can also override OnGridChangedAsync to execute code any time the filters change. You’ll see some use of these helper methods as we explore more controls.
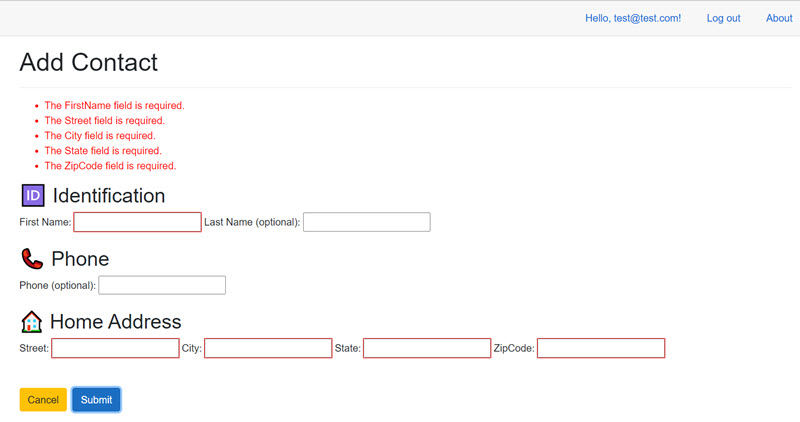
The ContactUpdate control is used for both add and edit operations. It is passed in a mode and a Contact instance. It uses the Blazor EditForm control to create form to add or update, and apply validations based on the data annotations. This results in the form fields being highlighted in red and an error message displaying whenever the value is invalid.
 <EditForm Model="@Contact" OnInvalidSubmit="(async () => await HandleSubmitAsync(false))"
              OnValidSubmit="(async () => await HandleSubmitAsync(true))">
    <DataAnnotationsValidator />
    <ValidationSummary />
    <h2>🆔 Identification</h2>
    <p>
        <label>
            First Name:
            <InputText @bind-Value="Contact.FirstName" />
            <ConcurrencyField Model="@Contact" DbModel="@DbContact"
                Property="obj => obj?.FirstName" />
        </label>
    </p>
    ...
</EditForm>
Here is the code-behind:
private bool _busy;

[Parameter]
public EventCallback<bool> ValidationResult { get; set; }

[Parameter]
public EventCallback CancelRequest { get; set; }

[Parameter]
public bool IsAdd { get; set; }

[Parameter]
public Contact Contact { get; set; }

public Contact DbContact { get; set; }

[Parameter]
public bool Busy
{
    get => _busy;
    set
    {
        if (value != _busy)
        {
            _busy = value;
            StateHasChanged();
        }
    }
}

public string Mode => IsAdd ? "Add" : "Edit";

public async Task CancelAsync()
{
    await CancelRequest.InvokeAsync(null);
}

public async Task HandleSubmitAsync(bool isValid)
{
    await ValidationResult.InvokeAsync(isValid);
}
The component delegates decisions to the parent control. A callback is invoked if the user hits the cancel button, and another callback is invoked when the user tries to submit the form. It is passed a boolean that indicates whether or not the form passed validation. To make sense of what happens, we have to move up to the AddContactControl. This control references the ContactUpdate control we just looked at. It binds a busy indicator, passes in a new contact, sets the mode to IsAdd and wires in methods to handle cancellation and submission.
<ContactUpdate Busy="@Busy" Contact="@Contact" IsAdd="true"
                   CancelRequest="Cancel"
                   ValidationResult="@(async (success) => await ValidationResultAsync(success))" />
A new contact is created on initialization.
protected override Task OnInitializedAsync()
{
    Contact = new Contact();
    return base.OnInitializedAsync();
}
The component has an instance of IBaseRepository<Contact> injected, so it is able to call the repository in response to the form submission:
public async Task ValidationResultAsync(bool success)
{
    if (!success)
    {
        Success = false;
        Error = false;
        return;
    }
    Busy = true;
    try
    {
        Contact = await Repo.AddAsync(Contact, User);
        Success = true;
        Error = false;
        // ready for the next
        Contact = new Contact();
        Busy = false;
    }
    catch (Exception ex)
    {
        Success = false;
        Error = true;
        ErrorMessage = ex.Message;
        Busy = false;
    }
    await InvokeAsync(() => StateHasChanged());
}
The add page just creates a new contact on success and allows the user to keep adding until they navigate away. If they choose to cancel, the app navigates to the same page the user left when they chose to add a contact.
public void Cancel()
{
    Nav.NavigateTo($"/{Controls.PageHelper.Page}");
}
The Controls instance is shared across the app, so the user can navigate to other pages and still return where they left off. The AddContactControl component needs to live in a page. The Client project defines the AddContact.razor page like this:
@using Microsoft.AspNetCore.Authorization
@page "/add"
@attribute [Authorize]
<AddContactControl />
The @page directive makes it a routed component. The component is accessible via the path /add. The [Authorize] attribute ensures the page will not render unless the user has been successfully authenticated. Finally, all of the remaining logic is encapsulated in the AddContactControl.
Next, we’ll take a look at building a filter with debounce, handle queries between the client and server, implement delete functionality and manage concurrency in part 3.
Part 3 of the series that describes a fully functional real-world project built in Blazor WebAssembly with EF Core. Part 3 focuses on querying, delete, update and optimistic concurrency.
Regards,

Part of the series: Blazor and EF Core
- EF Core and Cosmos DB with Blazor WebAssembly
- Azure AD Secured Serverless Cosmos DB from Blazor WebAssembly
- Build a Blazor WebAssembly Line of Business App Part 1: Intro and Data Access
- Build a Blazor WebAssembly Line of Business App Part 2: Client and Server
- Build a Blazor WebAssembly Line of Business App Part 3: Query, Delete and Concurrency
- Build a Blazor WebAssembly LOB App Part 4: Make it Blazor-Friendly
- Build an Azure AD Secured Blazor Server Line of Business App