
Deploy WebAssembly from GitHub to Azure Storage Static Websites with Azure Pipelines
Free automated builds to inexpensive hosting with examples in C, C#, Go and Rust
WebAssembly is a new technology (just released in 2017) that enables a stack-based virtual machine to run byte code (called Wasm) in your browser without plugins. The latest stable version works in all modern browsers, including mobile. The byte code format, standard instruction set, and simple memory model enables Wasm to run at near-native speeds. It also serves as a viable compilation target for multiple languages. The key benefits of Wasm include better performance compared to JavaScript, a smaller footprint for client-side code, and the ability to reuse existing software written in the language of your choice.

The CI/CD pipeline
Wasm is stored in a static file that can be loaded along with HTML, JavaScript, CSS, images, and other website assets. This makes Azure Storage Static Websites a perfect hosting platform for WebAssembly apps. Open source projects hosted on GitHub can take advantage of free Azure Pipelines instances to build and deploy your apps. This post explores how to set up continuous integration and deployment (CI/CD) for WebAssembly apps.
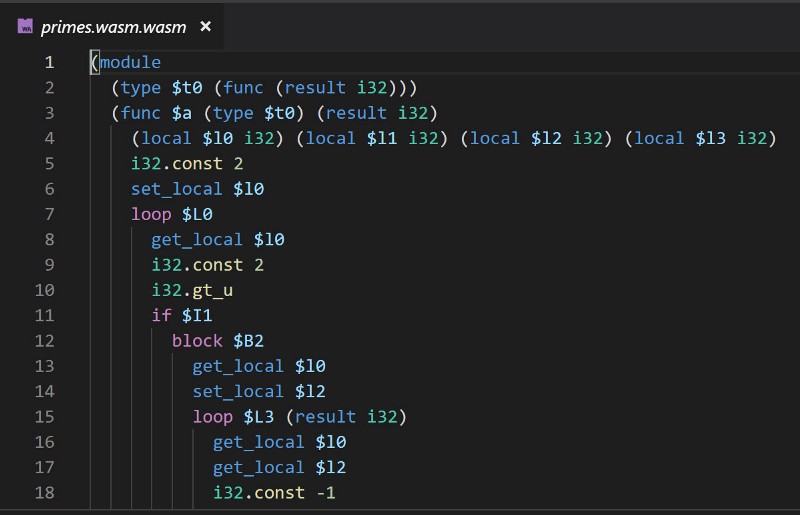
Example text-based representation of Wasm code
I wrote a series of articles to document my investigation of WebAssembly beginning with a unique framework called Blazor. Start with the .NET Framework — including the Common Language Runtime (CLR) — build it on top of WebAssembly, then add functionality to render and manage Single Page Applications using Razor templates and C#, and the result is Blazor (Browser + Razor templates). My first step in learning the framework was to port an existing Angular 2 app. I then created a Blazor presentation with several example applications:

Get the presentation, source code and step-by-step demo instructions for a session that covers how to run C# and .NET in the browser without plugins using Blazor over WebAssembly.
After recording and publishing a video series about Azure DevOps for .NET Developers, I immediately realized that because the demo apps are Single Page Apps deployed as a set of static assets, I can host them on storage and automate the build and deployment.
1️⃣ First Step: Add Azure Pipelines 🚀
To begin, open your GitHub project and navigate to the marketplace.

Navigate to the marketplace
Search for and choose Azure Pipelines.

Choose Azure Pipelines
Follow the prompts to create your Azure DevOps account. After you’ve created or selected a project, you are prompted to apply to all projects or pick specific ones. I recommend one Azure DevOps project per GitHub repository to start with. When prompted, choose public for your project. That doesn’t mean anyone will be able to see your secrets or deployment credentials; it gives them access to the build status and details. The deployment will be separate.
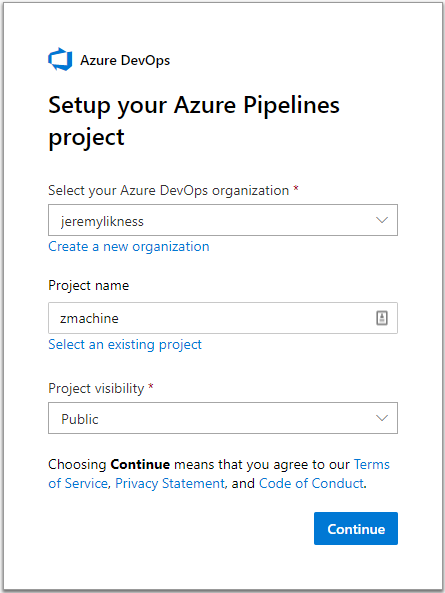
Create a new project
After you select the GitHub repository, a default azure-pipelines.yml file is generated based on preliminary inspection of your source code. For example, a .NET Core project will automatically generate a .NET Core pipeline. The initial pipeline is just a skeleton, you can choose “save and run” then throw away the results. The pipeline is checked into source control (without any secrets) so that users who fork your project can easily create their own automated builds. You can also use an existing pipeline as a starter template for new builds you create.
2️⃣ Second Step️: Configure the Build Yaml ⚙
The first build process I created was for my Blazor examples. There are several examples in the same repository with separate solutions, so I created multiple build steps. You can inspect the build pipeline here.
The start of the configuration looks like this:
# ASP.NET Core

trigger:
- master

pool:
  vmImage: 'Ubuntu-16.04'

variables:
  buildConfiguration: 'Release'
The build will automatically trigger based on a commit to the master branch. It uses a hosted Linux image (Ubuntu 16.04) and is configured for “release” or production.
📃 Learn more about hosted agents, including how they are configured and what software is installed, here: Microsoft-hosted agents for Azure Pipelines.
The next section of the Yaml file details the build steps.
steps:
- task: UseDotNet@2
  inputs:
    version: '3.0.100-preview4-011223'

- script: dotnet build --configuration $(buildConfiguration) ReusableComponents/ReusableComponents.sln
  displayName: 'dotnet build $(buildConfiguration) ReusableComponents'
- script: dotnet publish --output $(Build.ArtifactStagingDirectory)/ReusableComponents ReusableComponents/ReusableComponents.sln
  displayName: 'dotnet publish ReusableComponents'

- script: dotnet build --configuration $(buildConfiguration) MvvmPattern/MvvmPattern.sln
  displayName: 'dotnet build $(buildConfiguration) MvvmPattern'
- script: dotnet publish --output $(Build.ArtifactStagingDirectory)/MvvmPattern MvvmPattern/MvvmPattern.sln
  displayName: 'dotnet publish MvvmPattern'

- script: dotnet build --configuration $(buildConfiguration) LibrariesInterop/LibrariesInterop.sln
  displayName: 'dotnet build $(buildConfiguration) LibrariesInterop'
- script: dotnet publish --output $(Build.ArtifactStagingDirectory)/LibrariesInterop LibrariesInterop/LibrariesInterop.sln
  displayName: 'dotnet publish LibrariesInterop'

- script: dotnet build --configuration $(buildConfiguration) CodeBehind/CodeBehind.sln
  displayName: 'dotnet build $(buildConfiguration) CodeBehind'
- script: dotnet publish --output $(Build.ArtifactStagingDirectory)/CodeBehind CodeBehind/CodeBehind.sln
  displayName: 'dotnet publish CodeBehind'

- task: PublishBuildArtifacts@1
  inputs:
    ArtifactName: 'blazordist'
Blazor is currently in preview, so I use a .NET Core task to install the correct preview version. Next, each project is built and published into its own directory. Notice the use of the $(Build.ArtifactStagingDirectory) to reference where distributions should reside.
📃 You can read the full list of Azure Pipelines predefined variables.
Notice the last step publishes the artifacts. This places them in a compressed archive that you can inspect and download after the build. It also makes the artifacts available to the release pipeline that will deploy your assets. More on that later.
The Chaos Game with C
Someone wiser than me once said that to truly learn a technology, you should always go at least one layer beneath the surface. Underneath Blazor is WebAssembly, so I set out to learn as much as I could. There are several ways to build WebAsssembly, and the original tool chain that allows you to compile C and C++ projects to Wasm is called Emscripten.
I wrote about my experiments here:

Explore memory management, passing and accessing arrays between JavaScript and WebAssembly with this fractal “chaos game” coded in C.
Installing the tool chain is not straightforward and involves several steps. Fortunately, the entire development environment is configured and hosted in a Docker container. I chose to take advantage of that for my Emscripten build pipeline.
# Starter pipeline
# Start with a minimal pipeline that you can customize to build and deploy your code.
# Add steps that build, run tests, deploy, and more:
# https://aka.ms/yaml

trigger:
- master

pool:
  vmImage: 'Ubuntu-16.04'

steps:

- task: DockerInstaller@0
  inputs:
    dockerVersion: '17.09.0-ce'

- script: docker run -i --rm -v $(pwd):/src trzeci/emscripten emcc src/trees.c -O2 -s WASM=1 -s EXPORTED_FUNCTIONS="['_renderTree', '_getAddresses']"  -s EXTRA_EXPORTED_RUNTIME_METHODS="['ccall', 'cwrap']" -o trees.js -s ALLOW_MEMORY_GROWTH=1
  displayName: 'Build WebAssembly assets'

- script: cp web/* $(Build.ArtifactStagingDirectory)
  displayName: 'Copy web contents'

- script: cp trees.js $(Build.ArtifactStagingDirectory)
  displayName: 'Copy JavaScript loader'

- script: cp trees.wasm $(Build.ArtifactStagingDirectory)
  displayName: 'Copy Wasm'

- task: PublishBuildArtifacts@1
  inputs:
    ArtifactName: 'wasm-trees'
The first task installs the Docker client (the host is already available on the agent). I mount the source code onto the container and use the compiler to build the Wasm file and an associated JavaScript file that loads it. I copy the HTML and custom JavaScript for my app into the staging directory, followed by the loader and Wasm file. Finally, I publish the build artifacts.
Gophers Meet Plasma
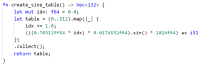
Go is a powerful language that supported multiple platforms from the beginning. After WebAssembly was released, the Go team added a new target operating system (JavaScript) and platform (Wasm) for builds. In an exercise to learn more about Go and how it generates WebAssembly, I ported an old “demo scene” plasma effect I used in the 1980s to run in the browser.

Plasma effect
I wrote about it here:

A walk through to building a high performance plasma effect using JavaScript’s canvas in conjunction with WebAssembly by compiling Go to WASM.
Go also provides a fully configured Docker container. Here is the build pipeline:
# Go
# Build your Go project.
# Add steps that test, save build artifacts, deploy, and more:
# https://docs.microsoft.com/azure/devops/pipelines/languages/go

trigger:
- master

pool:
  vmImage: 'Ubuntu-16.04'

steps:

- task: DockerInstaller@0
  inputs:
    dockerVersion: '17.09.0-ce'

- script:
    docker run -i --rm -v $(pwd):/usr/src/plasma -w /usr/src/plasma -e GOOS=js -e GOARCH=wasm golang:latest go build -o plasma.wasm plasma.go
  displayName: 'Build WASM'

- script:
    docker run -i --rm -v $(pwd):/usr/src/plasma -w /usr/src/plasma golang:latest cp /usr/local/go/misc/wasm/wasm_exec.js /usr/src/plasma
  displayName: 'Copy current wasm_exec.js'

- script: |
    cp wasm_exec.js $(Build.ArtifactStagingDirectory)
    cp plasma.js $(Build.ArtifactStagingDirectory)
    cp plasma.wasm $(Build.ArtifactStagingDirectory)
    cp index.html $(Build.ArtifactStagingDirectory)
  displayName: 'Copy assets to aritfacts staging'

- task: PublishBuildArtifacts@1
  inputs:
    ArtifactName: 'plasmawasmgo'
Notice there are two steps that use the same Docker container. Emscripten generated its own JavaScript loader for Wasm customized to the project. Go, on the other hand, ships a file named wasm_exec.js with each version that supports WebAssembly. This file is necessary for JavaScript to interact with the Go Wasm app, so I copy it from the container and into the staging artifacts.
Go is available as a build step/environment as well. I could have skipped the Docker image, configured Go on the build agent and built everything directly. However, I already was using a Docker-based build so it was faster for me to use the same steps for my build pipeline. Choices are good.
Plasma Gets Rust-y
The Rust 🦀 language is ideally suited to WebAssembly development. Unlike Go and C# that both require runtimes to execute (the Go file is over two megabytes in size as a result), Rust generates low-level platform-ready code like C/C++ but with a mature syntax and many built-in features that provide security and thread safety. Rust also embraced WebAssembly very early and built a set of tools to support Wasm development. As a result, Rust makes it much easier to build and package WebAssembly apps while producing streamlined byte code (the Rust Wasm file is only 61 kilobytes or about 3% the size of what Go generates).
I wrote about the experience here:
Building a plasma canvas effect using Wasm compiled from Rust.
The Rust build pipeline is significantly different that the previous ones.
steps:
- task: NodeTool@0
  inputs:
    versionSpec: '10.x'
  displayName: 'Install Node.js'

- task: CmdLine@2
  inputs:
    script: |
      curl -f -L https://static.rust-lang.org/rustup.sh -O
      sh rustup.sh -y
  displayName: 'Install Rust'

- script: 'echo "##vso[task.setvariable variable=PATH]$PATH:$HOME/.cargo/bin"'
  displayName: 'Update path'

- script: 'cargo install wasm-pack'
  displayName: 'Install wasm-pack'

- script: 'wasm-pack build'
  displayName: 'Build WebAssembly'

- script: 'npm link'
  displayName: 'npm link'
  workingDirectory: '$(Build.Repository.LocalPath)/pkg'

- script: |
    npm install
    npm link plasma-wasm-rust
    npm run build
  displayName: 'npm install and build'
  workingDirectory: $(Build.Repository.LocalPath)/www

- task: PublishBuildArtifacts@1
  inputs:
    PathtoPublish: '$(Build.Repository.LocalPath)/www/dist'
    ArtifactName: 'plasmawasmrust'
  displayName: 'Publish artifacts'
The environment is setup to use Node.js. A command-line task installs the Rust toolchain (“Rustup”), followed by “wasm-pack” that is used to build Wasm apps.
The need to install Rustup manually will go away soon. As of this writing, a pull request is in review to add Rust as a first-class pipeline task.
One folder contains the Rust project. That project is built using wasm-pack and generates the Wasm assets. Rust not only provides code to help connect structures in Rust to JavaScript, it also wraps the WebAssembly memory with code that makes it easier to pass buffers to and from Wasm. The project is linked to a Node project that contains the host HTML and JavaScript. A final npm build step packages everything together as a distinct set of assets to deploy, and the last task publishes artifacts directly from the distribution folder.
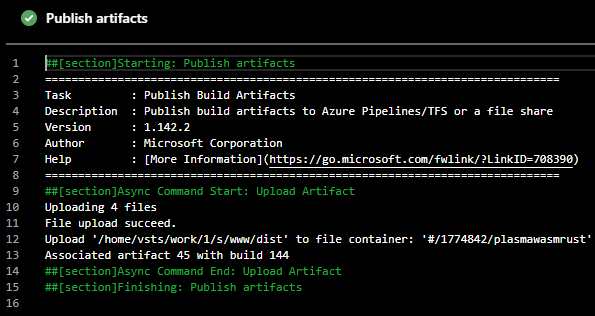
Successful publish task
Now artifacts exist for multiple flavors of WebAssembly projects. The next step is to host them using inexpensive Azure Storage.
Badge of Honor
At this stage if you’re like me, you’re probably excited about getting automated builds up and running and want to share it with the world. Azure Pipelines makes this easy for you. Navigate from “Azure Pipelines” to “Builds” and select the three dots in the upper then click on “status badge.”
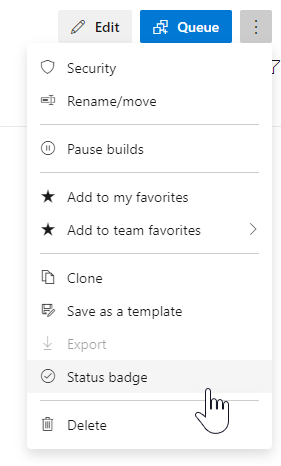
Selecting the Status Badge
The resulting dialog will allow you to specify some parameters and provides both a link to the status badge and markdown you can easily cut and paste into your README.md file.
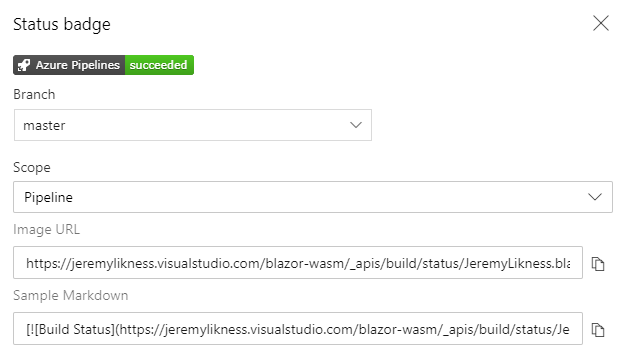
Configure the badge
3️⃣ Third Step: Create an Azure Storage Account
The next few steps require an Azure subscription. If you don’t have one already, you can grab a free Azure account. Use the ➕ in the upper left to add a new resource and choose Storage account.
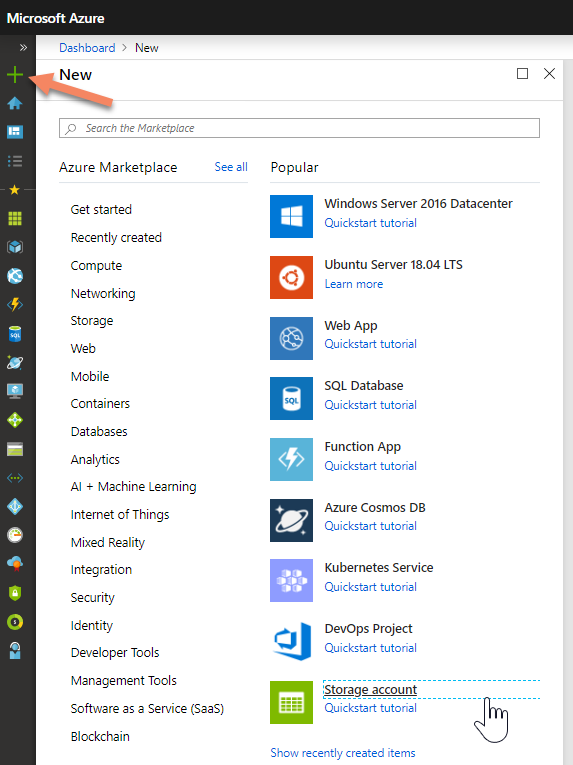
New storage account
Give the storage account a name, pick your resource group, and be sure to select “Storage V2 (general purpose v2)” as the account kind. Pick a replication option that suits you (higher availability comes at a higher cost). Review, then create the storage account and wait for the notification that is ready and available.
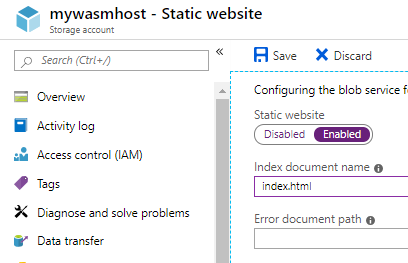
4️⃣ Fourth Step: Configure Your Static Website
Static websites are not enabled by default. To enable them, choose the “static websites” option, flip to “enabled” and optionally enter a default document and error document (what will be served when files aren’t found).
Static website creation
After you click “save” a special blob storage container named $web is created. This is the “root” of your static website. You will also be presented with the URL you can use to access the site.
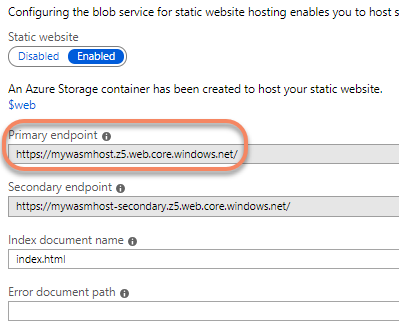
The static website URL
5️⃣ Fifth Step: Deploy
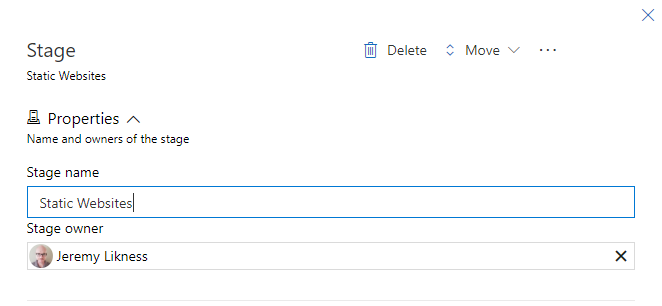
Navigate to “Releases” under “Azure Pipelines.” You will be presented with the option to create a new pipeline. Click “new pipeline” and choose “empty job.” You can name the first stage of your deployment pipeline. I’m using mine for demo assets, so I only have one stage and name it “static websites.”
Name the stage
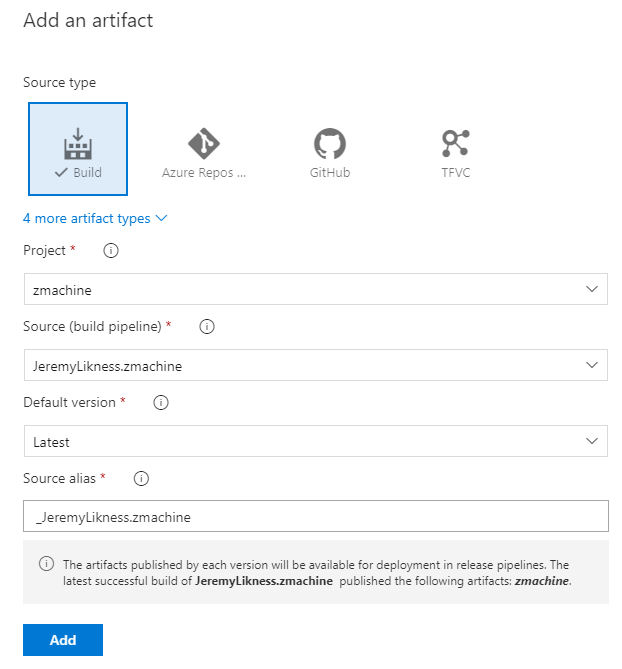
Next, add an artifact to feed into the release pipeline. See the “add” link.

Add a new artifact
A new dialog will appear. Select your project and source, and the default artifacts will populate. Click “Add” to add this artifact.
Add an artifact dialog
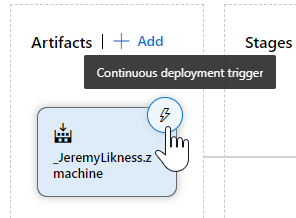
To enable continuous deployment (that will be triggered after every successful build) click on the little “trigger” icon in the upper right.
Choose the trigger
Finally, flip “continues deployment trigger” to “enabled.”

Enable the trigger
Next, click “view stage tasks” to begin building the deployment.
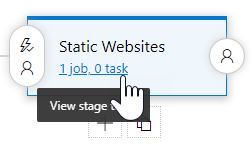
View stage tasks
Set the Base URL
I’m using a single static website to host multiple projects. The projects live under a folder path and not at the root of the website, so I need to specify the base URL using the <base href=""> HTML tag. The easiest way to do this is to click the little ➕ next to the agent job to add a new task then go the marketplace and install the free RegExReplace Build Task. In the resulting dialog, I specify the path to the main HTML file that hosts the app. The regular expression varies from project to project. In the case of the Rust app, there is no existing tag to replace. Therefore, I search for the end of a style tag I know exists and append the base tag to the end of it. The regular expression and replacement look like this:

Add the base ref after the closing style tag
Notice that I put my Wasm apps under the wasm folder with each project in its own folder, in this case PlasmaWasmRust. I do this for every project that is deployed. The advantage of applying this transformation during the deployment phase is that the exact same build artifacts can be used for any environment. If my staging truly was “staging” and required another step for production, I can use the same build artifact and apply a different transformation to target the production URL.
Copy the Assets to Storage
To copy the artifacts, use the “Azure File Copy Task.”
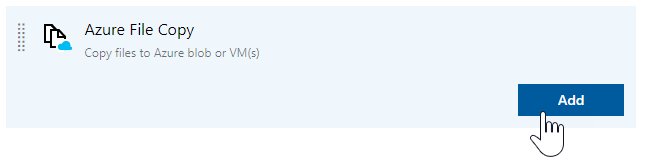
Azure File Copy Task
Give the task a name and click the ellipses after “source” to navigate to your artifact folder. Here I’ve selected zmachine.

Choose the artifacts folder
Pick “Azure Resource Manager” for the type and choose your subscription from the drop-down.
Note: if your subscription does not display automatically, you may need to use a service account to connect to Azure. To learn how, read: Connect to Microsoft Azure.
Pick “Azure Blob” as the destination type, then select the name of your storage account. The container name will be $web and the blob prefix is where you specify the folder path to place the artifacts in (it is the same “path” as the base URL but without the leading slash). Here is the task for the Rust project:
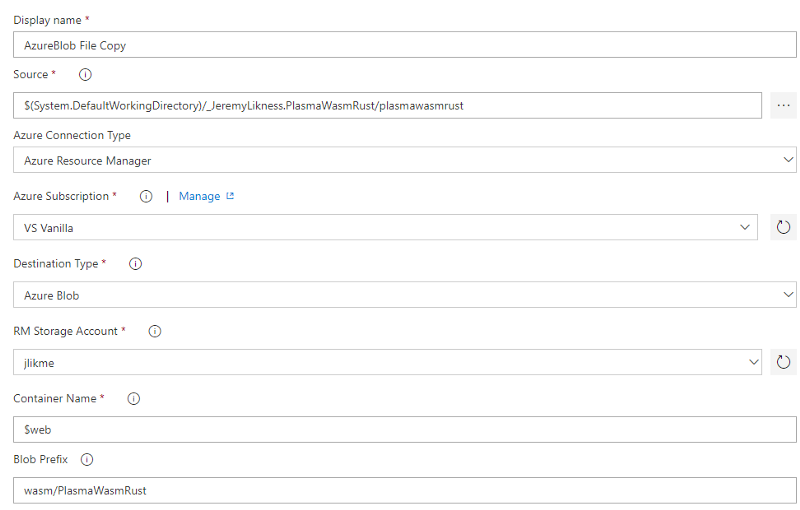
File copy dialog
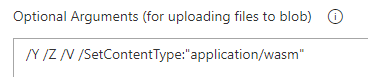
This step works for copying all of the main files into your static website, but one additional step is needed. The file copy task by default sets MIME types for files based on their extensions. This ensures they load correctly in your web browser. WebAssembly is a newer content type, so the current version of the task uses a default type that prevents it from loading correctly.
Set the MIME Type for Wasm Files
To adjust the default behavior, copy the .wasm files a second time and pass an argument that specifies the content type. Start by adding another Azure File Copy task. This time, set the source to a pattern that matches only your Wasm files:
$(System.DefaultWorkingDirectory)/_JeremyLikness.PlasmaWasmRust/plasmawasmrust/*.wasm
Next, add the optional arguments to set the file content type.
Set the content type
This last and final step should be all that is needed to successfully deploy your app. Save it and launch the stage (or commit to master and follow the entire pipeline from build through deploy) and see your app come out the other side!
Celebrate
You have a build badge, so why not a deployment one? To add your deployment badge, open the release pipeline and navigate to “options” then “integrations.” Enable the status badge and you’ll receive the appropriate link.

Set the deployment status badge
Summary
Azure Pipelines is free for open source projects hosted on GitHub. The goal of Azure Pipelines is to build any language, on any platform, and automate deployment to any destination. Do you have a mobile app? That’s no problem because Azure Pipelines will build your iOS code on a macOS agent (or Android code using a Java-based SDK) and automatically deploy it for review to the app store. Does your app have a comprehensive unit test suite? No problem! Azure Pipelines will run your tests and publish results, including code coverage, to your project dashboard.
Do you have an open source project that will benefit from automation?
Related articles:
- Build a Blazor WebAssembly Line of Business App Part 3: Query, Delete and Concurrency (Webassembly)
- Build a Blazor WebAssembly LOB App Part 4: Make it Blazor-Friendly (Webassembly)
- Build an Azure AD Secured Blazor Server Line of Business App (Webassembly)
- Celebrating Twenty Years of Open Source (Github)
- Docker Management and Kubernetes Orchestration (Docker)
- MongoDB on Windows in Minutes with Docker (Docker)
This post originally appeared at Deploy WebAssembly from GitHub to Azure Storage Static Websites with Azure Pipelines