
Part of the series: Vanilla.js
Welcome to Vanilla.js, a zero-footprint framework powered by JavaScript! Vanilla.js helps you build modern applications for the web, mobile, or desktop.
Wait, WHAT?! No LIBRARY or FRAMEWORK? Are you KIDDING me?!
This guide shows you how to build and run a simple Vanilla.js app. You’ll use a text editor to develop your app and use the JavaScript language features that benefit every Vanilla.js project.
This guide takes less than 10 minutes to complete. At the end of this guide — as part of final code review — there is a link to see the final application code. (If you don’t execute the steps in this guide, you can still access the final application code.)
Prerequisites
Before you begin, make sure your development environment includes a text editor (your choice) and a web browser (again, your choice).
JavaScript Engine
Vanilla.js requires a browser that runs JavaScript. Oh, wait, that’s every modern browser! (You should be good to go).
Package Manager and Build Tools
Vanilla.js depends on no packages and requires zero build tools.
This Quick Start uses a simple text editor of your choice that should already exist on your system. If not, provided you have the browser requirement you can alternatively use jsFiddle. You might get a little spoiled with how easy it is.
To check that you have the Vanilla.js client installed, open your browser, launch your developer tools (typically accessible via F12), type console.info("OK") followed by ENTER and verify that you see OK echoed back.
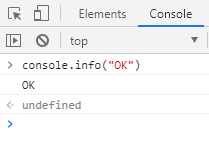
Success!
Step 1: Create an HTML File and Begin Editing
You will use your favorite text editor to create web pages and perform a variety of ongoing development tasks such as testing, bundling, and deployment.
Here’s some sample HTML to get you started:
<html>
  <head>
    <title>My Vanilla.js App</title>
  </head>
  <body>
    <div id="app">
    </div>
  </body>
</html>
Here’s some CSS. We need it so the application looks pretty. What the CSS actually does or how it was constructed is one of the great mysteries of modern web development.
body {
  font-family: sans-serif, arial, helvetica;
}

button {
  cursor: pointer;
  margin-top: 1em;
  padding: 1em;
  border-radius: 50%;
}

div.post {
  border-top: solid black 2px;
}

h1 {
  width: 95%;
  font-size: 1.5em;
  background: lightgray;
  padding: 0.2em;
  text-align: justify;
}

p {
  margin-left: 2em;
}

.tooltip {
  position: relative;
  display: inline-block;
  border-bottom: 1px dotted black;
}

.tooltip .tooltiptext {
  visibility: hidden;
  background-color: gray;
  color: #fff;
  text-align: center;
  padding: 5px;
  margin-left: -5px;
  border-radius: 6px;
  position: absolute;
  z-index: 1;
}

.tooltiptext:hover {
  visibility: visible;
}

.tooltip:hover .tooltiptext {
  visibility: visible;
}
You can include the CSS inside a <style></style> opening and closing tag, or save it in a file named style.css and include with this special line of code in the head section of your HTML document:
<link rel="stylesheet" type="text/css" href="style.css">
Step 2: Create the initial application
You develop apps in the context of your text editor. Your file system contains the files for one or more pages.
To create the initial application, either make a file named app.js and reference it in the body of your page like this:
<script src="./app.js"></script>
Or paste the code inside a <script></script> block. Here is the initial application code:
const app = document.getElementById("app");
window.run = () => app.innerText="Fun!";
app.innerHTML = '<button onclick="run()">Load</button>';
Yes, it’s a very simple application right now.
Step 3: Serve the Application
On most systems you can simply double-click or tap on the index.html file and it will open in your browser and run. If you need a web server, that’s when you start doing crazy things like installing third-party tools. Sure, it’s possible.
Assuming you already have node.js configured on your system (and its partner-in-crime, npm), you can install a simple web server like this:
npm install http-server -g
After that, run it from the directory your files are stored in by typing:
http-server .
Then you can navigate to your file at http://localhost:8080/index.html.
Your app will greet you with a button that transforms when clicked:
Step 4: Create a Fully Functional RSS-Style Reader with Dynamic Collapsible Posts and Geo-Encoded User Information that Reveals on Hover
Really, it’s not as much work as it sounds. For data, we’ll make a live call to the sample information provided by “JSON Placeholder.” There are several data sets, but we’ll just look at “posts” and “users”.
What library or framework should we use to grab the data?
Did you know that JavaScript has a handy, built-in fetch API? Here’s generic code that will fetch data from our endpoint and store it on an object named model. For example, “users” will end up as an array you can reference via model.users. Notice it takes a callback that is executed when the loading is complete.
const get = (model, domain, done) => {
  fetch(`https://jsonplaceholder.typicode.com/${domain}`)
    .then(response => response.json())
    .then(json => {
      model[domain] = json;
      done();
    });
};
Next, we can rewrite the main app code to take advantage of this. Overwrite whatever was there, paste in the get method listed above, and add this:
const app = document.getElementById("app");

const run = (model) => get(model, "users", () =>
  get(model, "posts",
    () => {
      model.users.forEach(user => model.userIdx[user.id] = user);
      app.innerText = '';
      model.posts.forEach(post =>
        app.appendChild(renderPost(post, model.userIdx[post.userId])));
    }));

app.appendChild(Wrapper.generate("button", "Load").click(() => run({
  userIdx: {}
})).element);
The code grabs posts, then users, then maps the users by id on userIdx to make them easier to reference. Don’t try to run the code yet! A few things are missing. There is a Wrapper class that eventually will help us dynamically generate HTML elements, and a renderPost function that, well, renders each post. It looks like we’re on the hook to build these. Let’s create the Wrapper.
class Wrapper {
  constructor(element, text, display = true) {
    this.element = document.createElement(element);
    this.element.innerHTML = text;
    this.display = !display;
    this.toggleDisplay();
  }
  click(val) {
    this.element.addEventListener("click", () => val());
    return this;
  }
  showSelectable() {
    this.element.style.cursor = "pointer";
    return this;
  }
  addClass(className) {
    this.element.classList.add(className);
    return this;
  }
  toggleDisplay() {
    this.display = !this.display;
    this.element.style.display = this.display ? "" : "none";
    return this;
  }
  appendChild(child) {
    this.element.appendChild(child.element);
    return this;
  }
  createChild(element, text, display = true) {
    var wrapper = new Wrapper(element, text, display);
    this.appendChild(wrapper);
    return this;
  }
  static generate(element, text, display = true) {
    return new Wrapper(element, text, display);
  }
}
It’s a bit of code, but all very straightforward. Oh, and the great thing about classes is that they’re reusable, so we’ll only ever have to write it once. Here’s a quick tour of methods:
- **Constructor —**generates an element and populates it with text. Also conditionally sets it to invisible or visible and wires up a toggle to make it easy to hide/show the element.
- **Click —**wrapper to add a “click” listener and call a method.
- **Show Selectable —**simply sets the style so the cursor turns into a hand indicating an action can be performed.
- **Add Class —**is this the appropriate place to point out that most of the method names are self-documenting?
- **Toggle Display —**ahem.
- Append Child — nests an element inside the parent.
- **Create Child —**a quick way to create and append a child.
- **Generate —**generates a new instance so you don’t have to call
newall the time.
A few notes. First, I didn’t trick you into using TypeScript. All of this is valid, modern JavaScript. Second, there is a reason the methods all
return this. No, not this that you’re reading, but theWrapperitself. That’s because it makes it possible to chain function calls for a more fluent API. We’ll see more of that in a second.
Modern JavaScript not only supports classes, but classical inheritance (cough, I couldn’t resist) as well. We can leverage that to make it easier to generate anchor tags.
class AnchorWrapper extends Wrapper {
  constructor(href, text, target = "_blank") {
    super("a", text);
    this.element.href = href;
    this.element.target = target;
  }
  static generate(href, text, target = "_blank") {
    return new AnchorWrapper(href, text, target);
  }
}
Now we can tie it all together. We already fetched the posts and users; we just need to use our handy helper classes to render it. Without further ado …
const renderPost = (post, user) => {
  const bodyDiv = Wrapper.generate("div", "", false)
    .createChild("p", post.body)
    .appendChild(Wrapper.generate("p", user.username).addClass("tooltip")
      .appendChild(Wrapper.generate("span", `${user.name} `)
        .appendChild(AnchorWrapper.generate(`mailto:${user.email}`, user.email))
        .createChild("br", "")
        .appendChild(AnchorWrapper.generate(
          `https://maps.google.com?q=${user.address.geo.lat}, ${user.address.geo.lng}`,
          "🌎 Locate"))
        .addClass("tooltiptext")));
  return Wrapper.generate("div", "")
    .addClass("post")
    .appendChild(Wrapper.generate("h1", `${user.username} — ${post.title}`)
      .showSelectable()
      .click(() => bodyDiv.toggleDisplay()))
    .appendChild(bodyDiv)
    .element;
};
The code fluently generates the template, wiring in place everything needed for the dynamic interactions. Let’s look at the finished app.

The final application
(Clicking on the location links will take you to an online map … you may find the destinations from the sample data to be quite interesting).
Final code review
You can browse the working example of the app that you created in this Getting Started guide.
Tip: jsFiddle is a great place to experiment with Vanilla.js.
“But, wait! What if the browsers I’m targeting don’t support the latest JavaScript (ECMAScript 6)?”
If it were me, I’d just rename that .js file to have a .ts extension and compile it to ES5.
Next steps
Now that you’ve seen the essentials of a Vanilla.js app and your favorite text editor, continue with these other deep thoughts:
- Do you really need a JavaScript framework?
- If you’re a long time JavaScript developer, were you aware of the power of the latest language implementations?
- Isn’t
fetchso much easier than (if not quite as fun as)XmlHttpRequest?
After reading this, you’ll be ready to continue exploring Vanilla.js on your own through the other guides and references available on the Internet, focusing on the features most important for your apps.
“But wait — what if I have to support legacy browsers?”
Read this!
Learn how to use TypeScript to convert and transform modern JavaScript to legacy ECMAScript 5.
Regards,

Part of the series: Vanilla.js