
Server-side Rendering (SSR) with Angular in .NET Core 2.1 (Part Three)
Deliver the goods faster with Angular Universal.
Part of the series: Angular and .NET Core
In the previous post, you learned how to set up a project that will build the client and server side components at the same time. It also supported seamless debugging between TypeScript client code and C# server code. In this post, you’ll learn how to leverage an Angular feature to enable server-side rendering.
This is a four-part series. You can navigate to the parts below (links will become active as articles are available:
- Get Started with Angular on .NET Core 2.1
- The Angular .NET Core 2.1 Template
- Server-side Rendering (SSR) with Angular in .NET Core 2.1 (you are here)
- Deploy Angular and .NET Core 2.1 to the Azure Cloud
Approach Three: Server-Side Rendering (SSR)
You can add a few simple modifications to the code to leverage Angular Universal and server-side or pre-rendered pages. The server will render a first pass of the page for faster delivery to the client, then immediately refresh with client code. In most cases, network speeds should be sufficient to accommodate the standard approach. In the rare case you need to explore SSR, there are a few caveats to consider:
- This requires Node.js is installed on the host machine to facilitate the pre-rendering step
- The full
node_modulessub-directory must be published, and this will cause the Internet to break and your lights to dim - Your code must make additional checks to ensure it is not accessing features that aren’t available on the server, such as the
windowobject and local storage
If you’re still convinced you want to try this out, follow the documentation for Angular Server-Side Rendering (SSR) with .NET Core. To prove it’s working, I modified main.ts to provide this value:
{ provide: 'OS', useValue: 'This is on the client.'}
I then updated main.server.ts to provide this:
{ provide: 'OS', useValue: params.data.os }
Injected it into app/home/home.component.ts:
import { Component, Inject } from '@angular/core';

@Component({
  selector: 'app-home',
  templateUrl: './home.component.html',
})
export class HomeComponent {

  os: string = null;

  constructor(@Inject('OS') public osinject: string) {
    console.log(osinject);
    this.os = osinject;
  }
}
Finally, I render it in app/home/home.component.html:
<h1>Hello, {{ os }}!</h1>
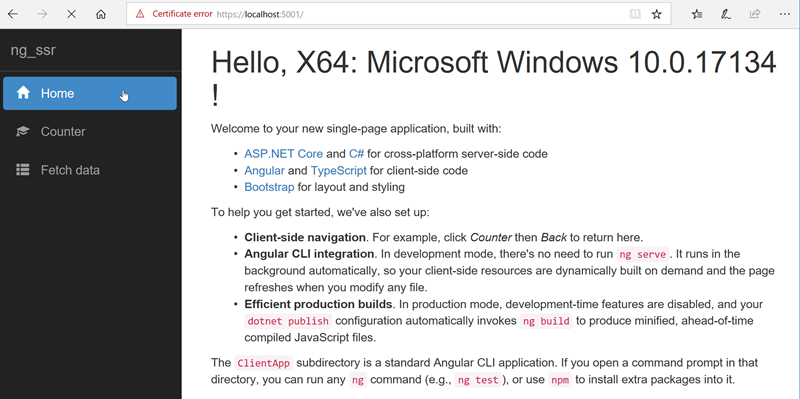
You may have to set a break point (I recommend using main.ts) to see the pre-rendered page, but before the client render takes over it will look something like this:
It’s nice to have an app up and running, but if you’re going to scale you’ll need to host it somewhere besides your laptop. In the next post, we’ll explore how to deploy your Angular apps to the cloud using Azure.
Read the documentation for server-side rendering (SSR) Angular in .NET Core 2.1.
Regards,

Previous: The Angular .NET Core 2.1 Template
Next: Deploy Angular and .NET Core 2.1 to the Azure Cloud
This is a four-part series. You can navigate to the parts below (links will become active as articles are available:
- Get Started with Angular on .NET Core 2.1
- The Angular .NET Core 2.1 Template
- Server-side Rendering (SSR) with Angular in .NET Core 2.1(you are here)
- Deploy Angular and .NET Core 2.1 to the Azure Cloud
Part of the series: Angular and .NET Core
- Get Started with Angular on .NET Core 2.1 (Part One)
- The Angular .NET Core 2.1 Template (Part Two)
- Server-side Rendering (SSR) with Angular in .NET Core 2.1 (Part Three)
- Deploy Angular and .NET Core 2.1 to the Azure Cloud (Part Four)