
Five RESTFul Web Design Patterns Implemented in ASP.NET Core 2.0 Part 5: Security
Securing access to web APIs
Part of the series: Five RESTFul Web Design Patterns Implemented in ASP.NET Core 2.0
This is the fifth part in a multi-part series on Web API design. Here is the full list for easy navigation:
- Intro and Content Negotiation
- HATEOAS
- Exceptions
- Concurrency
- Security (you’ve secured this one)
- Bonus (because I said it would be five): Swagger
Some APIs have the luxury of permitting anonymous access to anyone who has access to the Internet. My link shortener is an example of a API that translates short URLs to longer counterparts for anyone interested, no login required. It is more common to require that the consumer of an API provide a confirmed identity so that the server can determine the appropriate permissions to secure access. There are fundamentally three components to successfully securing an API: encryption to ensure prying eyes can’t see what is going on, authentication to prove the identity of the API consumer and authorization to determine what that identity has access to.

To simplify things, I’m going to assume the encryption is handled in the transport layer. That’s the protocol that your API runs on.
First, I assume you will secure your endpoint using the latest browser compatible technology. You may think that means using the Secure Sockets Layer protocol, but in fact that technology is already aging and has been replaced with the newer Transport Layer Security protocol. Diving any deeper into how that works is outside the scope of this series; however suffice it to say that friends don’t let friends release APIs that don’t begin with https.
Second, I’ll share with you a way to sign (and verify) the information you share about identity to avoid tampering. That will come later. Before we get into cryptographic hash functions, let’s look at a super simple way to secure access to your API that doesn’t involve math but does require you to keep secrets.
Custom Header
Assuming the connection is encrypted, the easiest way to secure access is to add a secret. On the server side, you can simply pick a custom header and check for a custom value. Here’s the super-secret header property I use in this project:
const string SECRET_HEADER = "My-Secret";
In the APIs that need to be secured, the code simply checks for the presence of the property and compares it against the secret phrase my-secret. (I know, I know, this is a simple demo, OK?)
if (!HttpContext.Request.Headers.ContainsKey(SECRET_HEADER) ||
!HttpContext.Request.Headers[SECRET_HEADER].Equals("my-secret"))
{
return new StatusCodeResult(401);
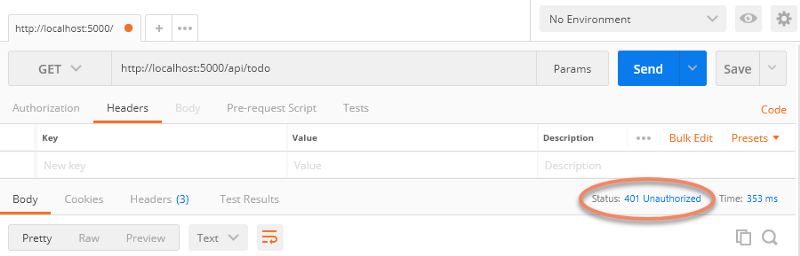
}The postman has to knock twice for this one. First time, no go:
Next, we add the secret header:
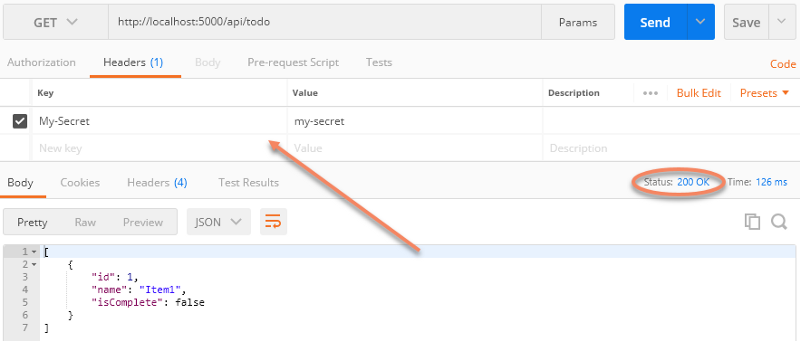
You can even write some middleware to take care of the check at a global level. I wouldn’t waste your time, however. There are several flaws to this approach. Specifically:
- If the secret leaks, anyone can gain access
- There is no identity, so you have no idea what clients are making requests
Fortunately, security has been a nail in web apps for a long time and there are plenty of hammers available. One very popular solution involves using JavaScript Web Tokens (JWT).
JavaScript Web Tokens
JavaScript Web Tokens are defined in RFC 7519. Don’t worry! I’ll save you some time by summarizing. JWT by itself doesn’t necessarily have to have anything to do with authentication and authorization. Instead, it defines a safe way to share secure information between two parties. JWT describes a specific JavaScript Object Notation (JSON) format that has three parts:
- A header that describes the type of object (JWT) and the algorithm used to verify it hasn’t been tampered with
- A payload that contains the information to be shared, typically a collection of claims such as “this is user Fido” or “this identity is permitted to update foo”
- A signature to secure the header and payload
You can use the handy jwt.io site to see this in action.
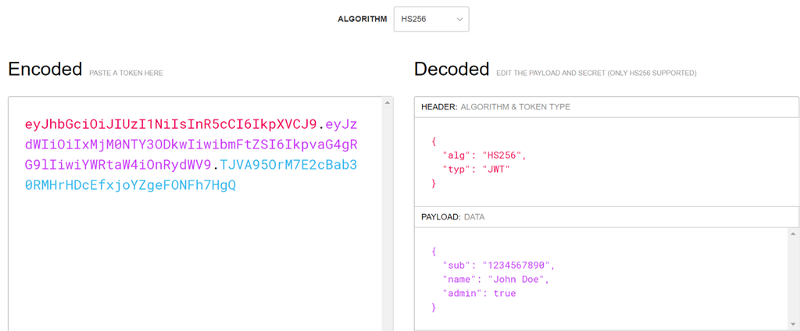
The red portion is the header. This:
eyJhbGciOiJIUzI1NiIsInR5cCI6IkpXVCJ9
Is just a base64 encoded version of this (you can decode it yourself using this tool):
{
   "alg" : "HS256"
   "typ" : "JWT"
}
The purple (pink? I’ve never been great with colors) portion is the payload (also encoded). The example contains three claims for sub, name, and admin.
Finally, the blue portion is the signature. Using the HS256 algorithm with a secret, the header and the payload were hashed to generate the signature. This is what keeps the token secure: even if someone intercepts the token and is able to read its contents, any modifications invalidate the signature. It’s like breaking a seal and the server can reject the request when the seal is broken.
One of the great things about JWT tokens is that they can work with any type of authentication system. Regardless of how you verify the user’s identity and claims, if in the end you encode the values in a JWT token, the rest of your application can remain completely ignorant of how the authentication took place. For example, you could create a debug process that generates a pre-defined token for testing, then use Azure Active Directory in your production system, and not have to change any of your controller code.
The typical flow for authentication looks something like this:

The “secret” is shared between the authentication server and the application.
In an ASP.NET Core application, there are a few steps to implement JWT tokens. First, you must add two packages. One provides a generic way to deal with JWT tokens and map them into the .NET identity model:
dotnet add package System.IdentityModel.Tokens.Jwt
The other specifically integrates with the application pipeline to implement authentication using JWT tokens using “bearer authentication” which means putting the token in the header:
dotnet add package Microsoft.AspNetCore.Authentication.JwtBearer
The support for tokens is typically wired up in Startup.cs — this example keeps things simple, but in a production system you’d likely encrypt and store the secret or pull it from environment variables. In this case, we’re also cheating and indicating the “issuer” is a different port, even though we’ll handle making the token in the same application to keep it simple.
services.AddAuthentication(options =>
{
    options.DefaultAuthenticateScheme = "JwtBearer";
    options.DefaultChallengeScheme = "JwtBearer";
})
.AddJwtBearer("JwtBearer", jwtBearerOptions =>
{
    jwtBearerOptions.TokenValidationParameters = new TokenValidationParameters
    {
        ValidateIssuerSigningKey = true, // verify signature to avoid tampering
        IssuerSigningKey =
          new SymmetricSecurityKey(System.Text.Encoding.UTF8.GetBytes(SECRET)),
        ValidateIssuer = true,
        ValidIssuer = "http://localhost:5001", // site that makes the token
        ValidateAudience = true,
        ValidAudience = "http://localhost:5000", // site that consumes the token
        ValidateLifetime = true, //validate the expiration
        ClockSkew = System.TimeSpan.FromMinutes(5) // tolerance for the expiration date
    };
});
In the Configure method, we also specify that we want to activate the authentication middleware (and remember to do this before activating the MVC middleware):
app.UseAuthentication();
Now you can protect any controller or controller method simply by adding the [Authorize] attribute. Of course, without a token, those calls are going to end up unauthorized (I didn’t take another screenshot because it looks exactly like the 401 — not authorized example above).
For this demo, we’ll manually create an arbitrary token so you can see how it’s done. In production you would use whatever authentication provider you want such as forms-based authentication or OAuth.
[Route("GetToken")]
[HttpGet]
public IActionResult GetToken()
{
    var claims = new[]
        {
          new Claim(JwtRegisteredClaimNames.Sub, "[email protected]"),
          new Claim(JwtRegisteredClaimNames.Jti, System.Guid.NewGuid().ToString()),
        };

    var key = new SymmetricSecurityKey(System.Text.Encoding.UTF8.GetBytes(SECRET));
    var creds = new SigningCredentials(key, SecurityAlgorithms.HmacSha256);

    var token = new JwtSecurityToken("http://localhost:5001", //issued by
        "http://localhost:5000", //issued for
        claims, //payload
        expires: System.DateTime.Now.AddMinutes(30), // valid for 1/2 hour
        signingCredentials: creds); // signature

    var tokenEncoded = new JwtSecurityTokenHandler().WriteToken(token);

    return new OkObjectResult(new { token = tokenEncoded });
}
With this in place, we can fire up Postman and hit the GetToken endpoint:
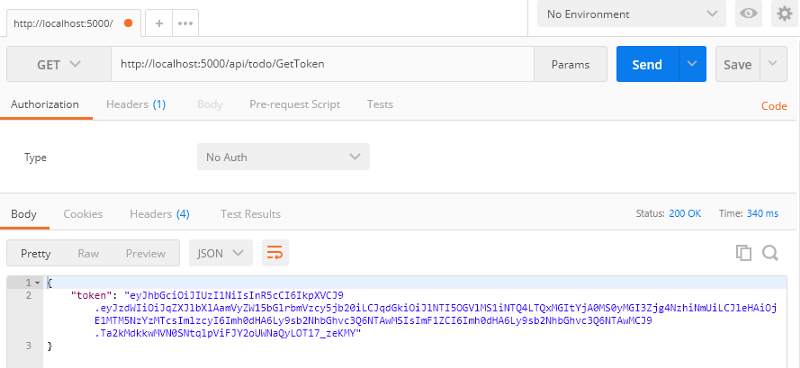
(Remember, you can take the first two parts separated by the . and decode them to see the claims, so the token doesn’t hide information — it just ensures the information is valid).
Next, in our request, we need to apply the token to the header. The proper approach is to add an Authorization property to the header, with a value of Bearer followed by the encoded token.
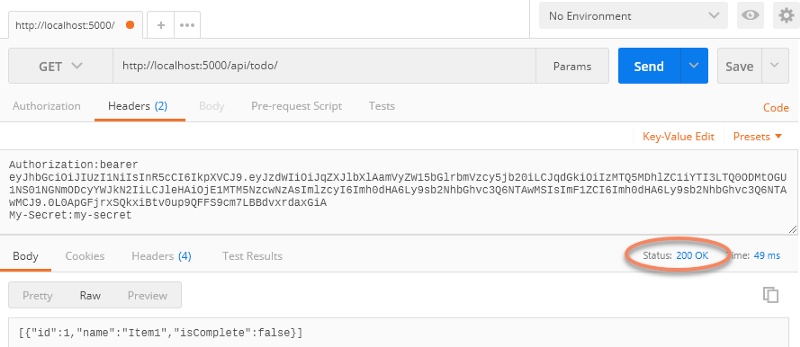
That’s it — we’re good to go.
Other Options
There are, of course, other “out of the box” options that you can use. Many of those ultimately provide a token in the JWT format. ASP.NET Core makes it easy to integrate with any number of options. A great way to learn more is to read Enabling authentication using Facebook, Google, and other external providers.
Now do you feel secure?
The fun doesn’t end here …
Easy navigation:
- Intro and Content Negotiation
- HATEOAS
- Exceptions
- Concurrency
- Security (you’ve secured this one)
- Bonus (because I said it would be five): Swagger
Regards,

Part of the series: Five RESTFul Web Design Patterns Implemented in ASP.NET Core 2.0
- Five RESTFul Web Design Patterns Implemented in ASP.NET Core 2.0 Part 1: Content Negotiation
- Five RESTFul Web Design Patterns Implemented in ASP.NET Core 2.0 Part 2: HATEOAS
- Five RESTFul Web Design Patterns Implemented in ASP.NET Core 2.0 Part 3: Exceptions
- Five RESTFul Web Design Patterns Implemented in ASP.NET Core 2.0 Part 4: Optimistic Concurrency
- Five RESTFul Web Design Patterns Implemented in ASP.NET Core 2.0 Part 5: Security
- Five RESTFul Web Design Patterns Implemented in ASP.NET Core 2.0 Bonus: Swagger